Custom connection setup guide - Part 3
This guide details how to hook up an internally managed identity provider to Authress to enable consistent token generation. In the case you want to connect a public federated provider instead, follow one of these guides:
An internally managed identity provider usually exists in a legacy platform. You have some architecture today to verify users and generate user identity tokens. If these tokens are already OIDC compliant and are signed by an asymmetric algorithm, then you should follow the Connecting a non-standard public identity provider guide.
This avoids the need for your applications to interoperate between two types of tokens--the ones that Authress generates, and the ones being generated by your legacy identity provider.
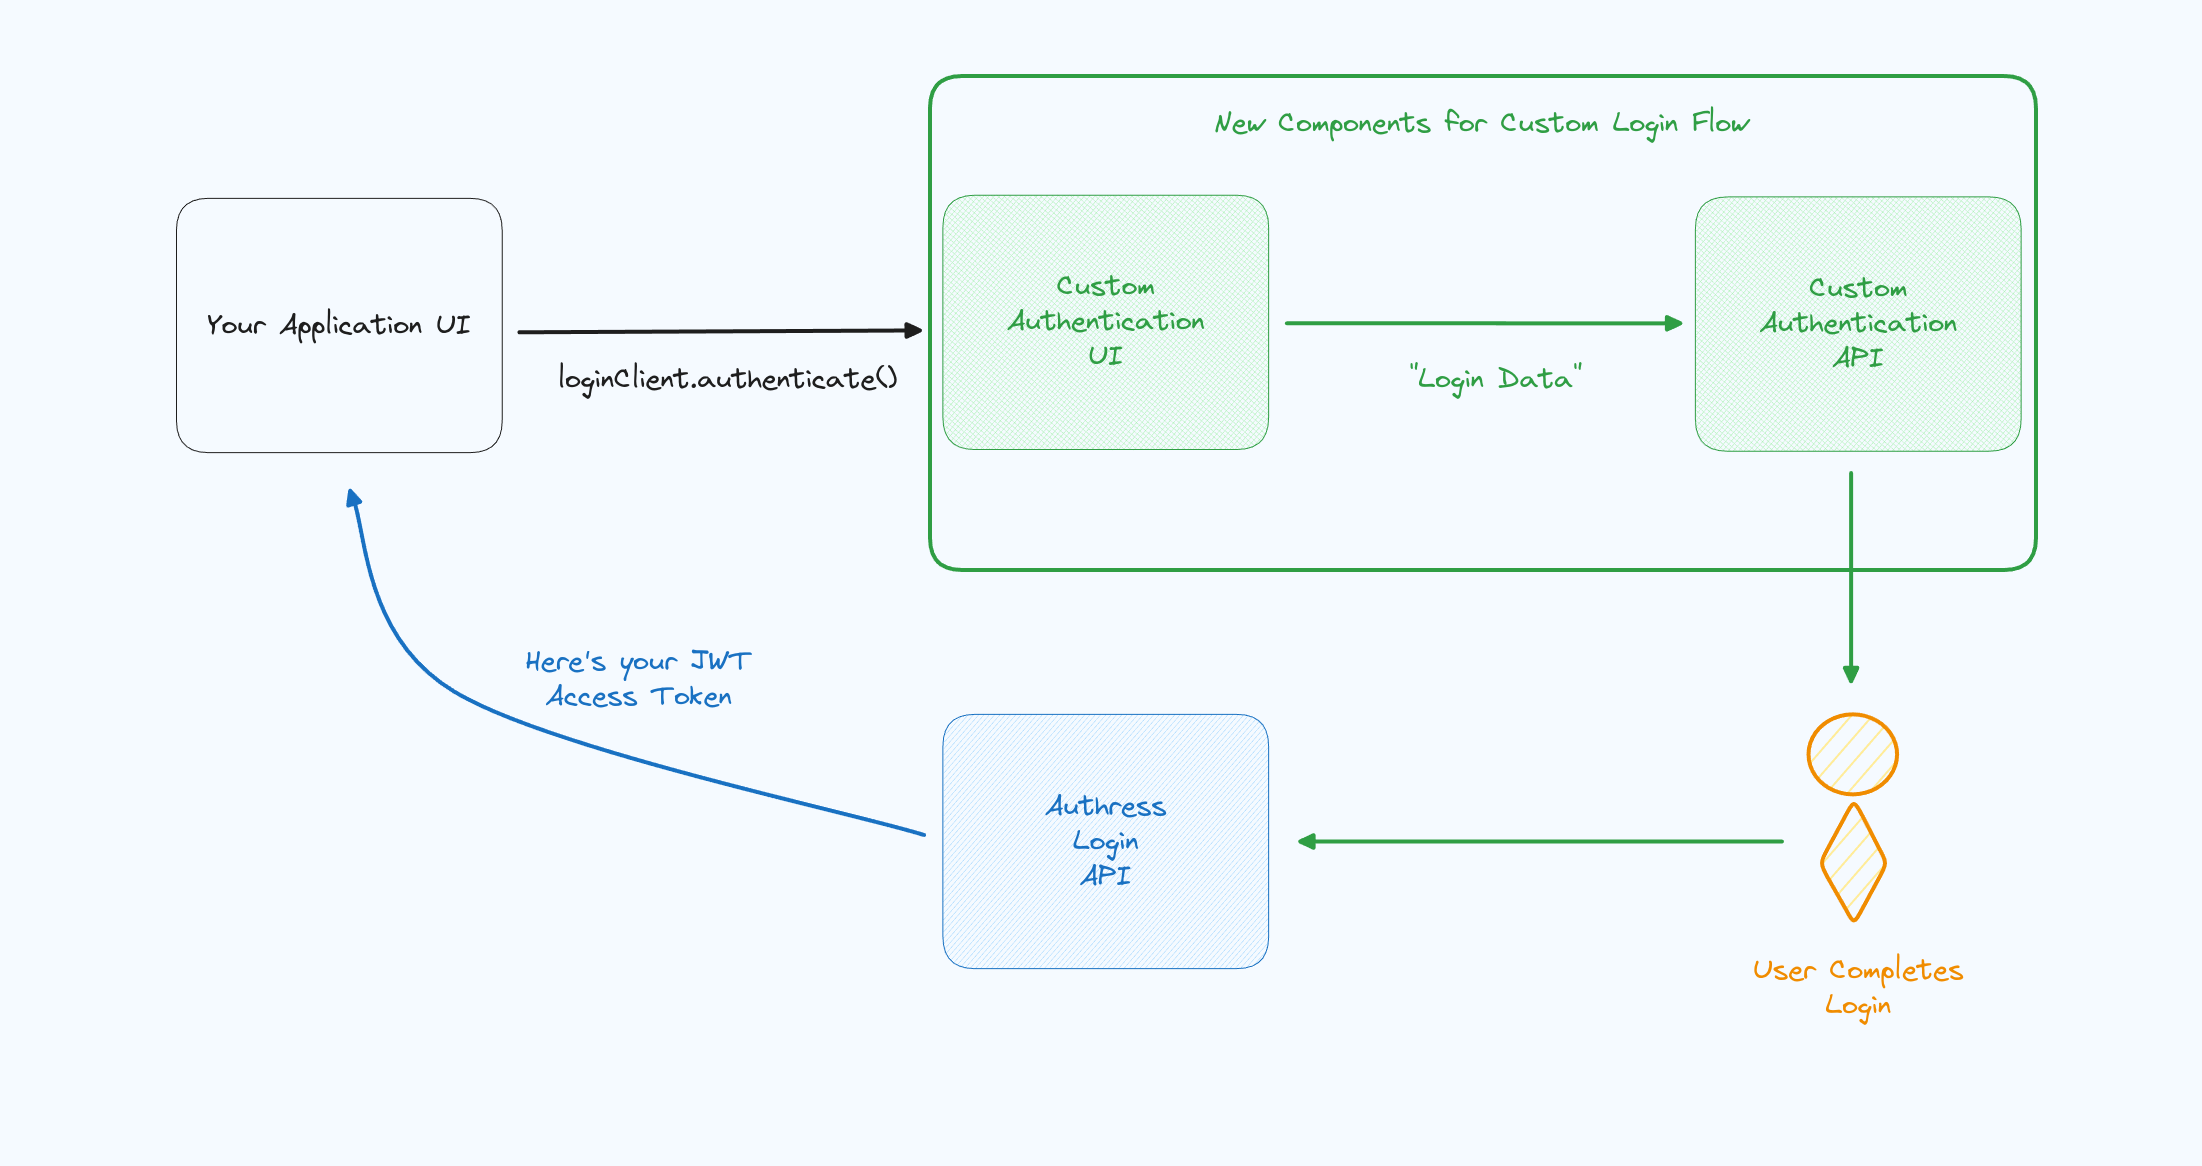
Background: The Authress login flow
The standard Authress login flow, starts in your web app. The user requests to login, which generates a login request using one of your configured Authress connections. The connectionId and applicationId are passed to the login SDK. This is the same flow your application is already using to login with Authress, and it will be reused for your legacy identity provider, so no changes are necessary to your web app. As a reminder these are the relevant SDK methods:
import { LoginClient } from '@authress/login';
const loginClient = new LoginClient({
  // Both of these properties can be found and configured at:
  // https://authress.io/app/#/manage?focus=applications
  authressApiUrl: 'https://auth.yourdomain.com',
  applicationId: 'YOUR_APPLICATION_ID'
});

// This will redirect the user to the specified connection login UI,
// track their session with Authress, and then redirect back to your specified
await loginClient.authenticate({
  connectionId: 'SERVICE_CLIENT_ID',
  redirectUrl: window.location.href
});

...
The rest of the authentication flow follows he standard process and can be reviewed in the Authentication Quick Start.
Instead of specifying a Connection ID in the connectionId property of the authenticate(), the Authress authenticate method also accepts a Service Client ID. When that Service Client is enabled as a Custom authentication method, Authress will accept the service client ID as a connection ID.
Overview
This is the high level flow that represents what we will be implementing in the rest of this knowledge base article:
Implementation steps
1. Linking your identity provider
To link the identity provider to Authress, a new special kind of connection will be created. This connection treats your existing identity provider with advanced permissions allowing it to request Authress identity tokens.
Generate a new Authress Service Client. Enter a name for the client, and select the option to Enable custom Authress user token generation. This allows this client to directly communicate with the Authress login API to request user identity tokens.
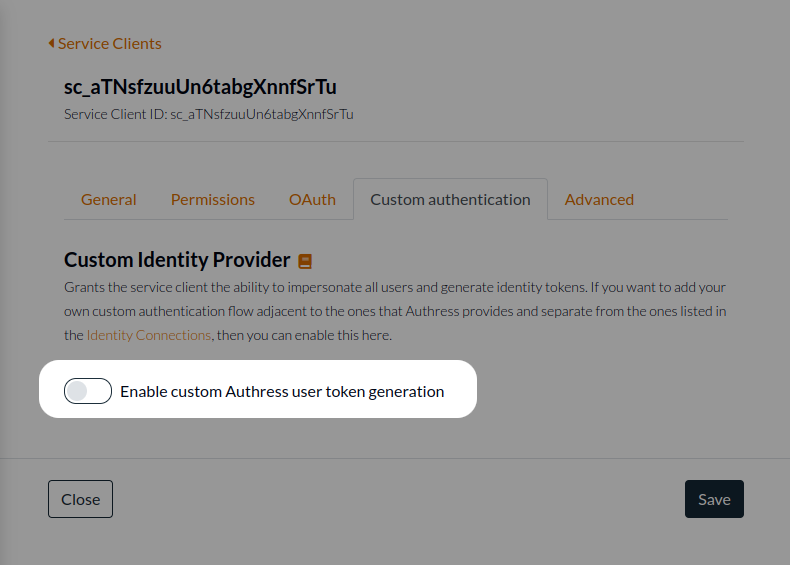
You will note a big warning when enabling this feature on the Service Client Custom authentication tab. This is conveys additional importance in granting the service client this ability. By default, most Authess accounts will not need to enable this functionality. This warning exists to deter enabling it there when not absolutely necessary. However, if you are following along in this guide, then this is the correct time to enable it. The reason for this security banner, is because enabling custom authentication will grant the service client Authress-Level privileges regarding the generation of JWTs and User IDs. Make sure to take the utmost protections possible with service client credentials generated for clients with this ability.
2. Enter your legacy identity provider URL
Your identity provider has a UI associated with identifying the user. This may be a username/password prompt or an email prompt requesting the user's email for a magic login token based flow. Set the Authorization Url to be this URL.
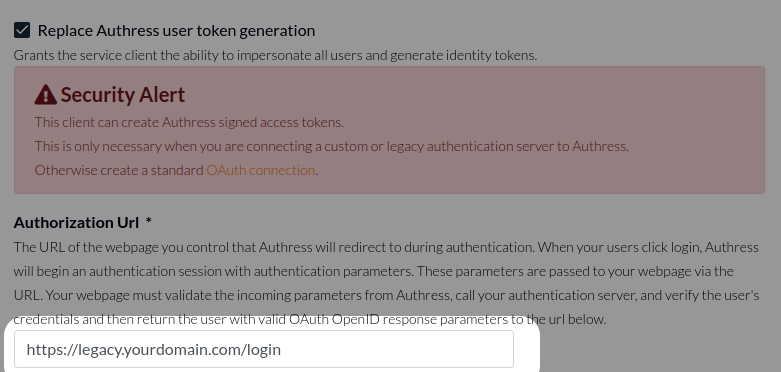
At this point, it is recommended that you click Test Connection to ensure that the redirect to your identity provider is correct.
3. User agent flow
When the user client logs in and the Authress Login SDK is invoked via the loginClient.authenticate() method, the user will be redirected to the specific URL from #2 above. They'll begin the flow, whatever this may be. In the case of username/password or a magic token, you'll use the existing logic to direct and navigate the user to the appropriate location. The result of their interactions must be a request to your existing identity service:
- In the case of username/password, send the username and password to your identity service. The identity service should verify the user's credentials and then generate an Authress assertion to continue the login process.
- In the case of a magic token, the user should be directed to retrieve the token, and then redirected back your identity UI. The UI should pass the token to your identity service to be verified. Once verified, the service will then generate an Authress assertion to continue the login process.
Important: Authress will send a state parameter to your Authorization URL. This state parameter must be passed back to Authress in the next step. This token is not sensitive and should not be treated as a replacement for a secure identity.
4. Generating the Authress Assertion
Once the user's identity has been verified, the identity service is ready to hand-off the user to Authress to complete the login flow. This can be done using the generateUserLoginUrl() method from one of the Authress SDKs, which creates the Authress assertion and redirect url. (Note: this happens inside the identity service, not in the user's UI)
import { ServiceClientTokenProvider } from '@authress/sdk';

/**
 * state {string}
 *    The state value passed to the identity service as part of user login. Found in the query string.
 * redirectUri {string}
 *   The redirect_uri value passed to the identity service as part of user login. Found in the query string.
 *   This value will match your custom domain global redirect value, such as: https://auth.yourdomain.com/login
 */
function getUserRedirectUrl(state, redirectUri) {
    const serviceClientId = 'SERVICE_CLIENT_ID';
    const accessKey = 'SERVICE_CLIENT_ACCESS_KEY';

    const tokenProvider = new ServiceClientTokenProvider(accessKey);
    const userId = 'Verified_User_ID';
    const authressLoginUrl = await tokenProvider.generateUserLoginUrl(redirectUri, state, serviceClientId, userId);
    return authressLoginUrl;
}
5. User completes the login flow
Step #4 generates an assertion in the form of a URL. This URL should be sent back to your user, in the form of a browser redirect. The user will be directed to Authress to complete the assertion, and then will be logged in with an Authress identity token. The token and user will be sent back to the origin application url that started the process.
Frequently Asked Questions
What should the Verified User ID be?
Depending on the custom authentication mechanism you are building this could be different values.
The Verified User ID is user ID identifier defined by your custom login process. This value is used to uniquely identify who the user is, it is necessary because somewhere we'll need to collectively (Authress and your app) decide which user is authenticating. Authress doesn't know this up front as the authentication process is happening in your custom auth comonent. That is the purpose of the custom auth. So this property conveys to Authress who your app believes the user is. An example of this might be that you have a legacy login integration. Your legacy login flow then would log the user in via that mecahnism. After the user logs in, concievably they have defined User ID in your system, this would be the Verified User ID.
Another scenario would be the case of building a custom Email passwordless authentication. In this case, the Verified User ID should be the user's email address. Since this custom process completes the user identity You can imagine that multiple users have the same email address or phone number or there exists some other complex process in which the user can be identified. Authress allows for this to be flexible. And any value per use can be passed in here as long as it is consistent. The email address is the most common option, but so is the sha256(email). What is important is that per user it is:
- unique
- consistent
This value will be used by Authress to generate an Authress User ID. The Authress User ID is the one that you will see in your application and in the Authress generated JWTs.