Authorization
Authorization in Authress is how you grant users access to perform actions on resources. Performing user authorization checks requires three pieces:
- User
- Permission
- Resource
In Authress, a user has a permission to perform an action on a resource. This access is captured in Authress in an Access Record. Access records govern all access in Authress. You create and manage access records for all permissions you want to assign to users. Additionally, Authress also creates access records at runtime when Authress releated resources are created, updated, and deleted.
The changes that are made to a user's or group's access is captured in the Authress Audit Trail.
Verifying user authorization happens at runtime, where access records are used to verify access. Below is a high level guide to understanding the different core aspects of Authorization in Authress.
Throughout the Management Portal, the API, and the SDKs, you will see references to a User ID. User IDs can either be one from your existing Authentication system or generated by Authress. For Authress generated users you can convert an incoming request JWT to a user ID. For more information about doing that see Verifying Authress JWTs.
Core Aspect: User roles
See Permissions and Roles for more information on how to use roles
Authress doesn’t know how your software works, nor does it need to. But it does need to know about your permissions.
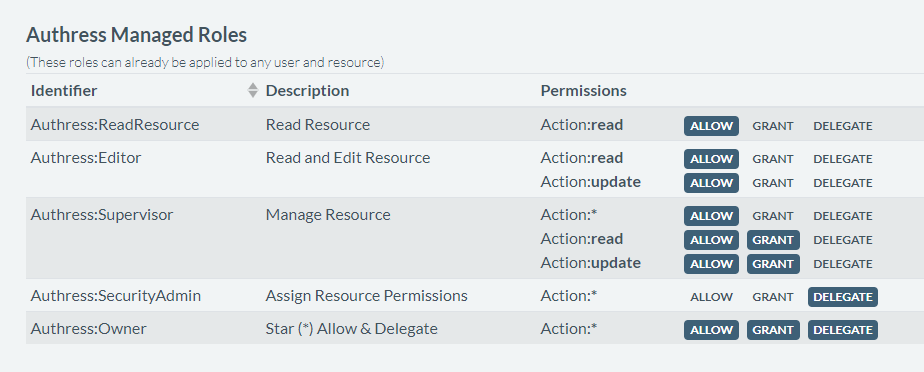
In Authress, permissions are grouped into roles. Think of roles as sets of permissions that are often granted together. For example, a document owner may be able to “read”, “write”, and “delete” the document, while a reviewer would be only able to “read” and “suggest”.
You may already have a model of your user personas and typical actions associated with each of them - these will likely correspond to your roles. If your model is incomplete, or you’re not ready to think about it yet, you may use the built-in roles and expand them later as your software evolves. You can define your roles, as well as see the built-in ones in Management Portal.
Later on, you’ll be applying these roles to specific resources and users through the access records, described below.
Core Aspect: Configuring user permissions
See Access Records for more information on assigning permissions
Authress authorizes your users based on the permissions you configure. This is done through access records. Authress does not need to know about your users directly. Instead, access is granted to your users by their User ID. To migrate to Authress or start granting permissions, access records will be created that contain the relevant userId, the role, and the resources. If you are interested in support to help migrate to Authress or want to set up a POC, please reach out to the development team.
Whenever a new resource is created in your software (e.g., user creates a new document), you create a new access record in Authress by calling respective API and specifying the roles. You can also do this manually in Management Portal. Here is an example code snippet to do that:
import { AuthressClient } from '@authress/sdk';

const authressClient = new AuthressClient()

[POST('/v1/resources')]
function createResource(request) {
  await authressClient.userPermissions.authorizeUser(request.userId, `resources/${resourceId}`, 'UPDATE');
  // Create new resource
  // ...
  const newRecord = {
    recordId: `rec_resources_${resourceId}`,
    users: [{ userId: request.userId }],
    statements: [{
        roles: ['Authress:Owner'],
        resources: [{ resourceUri: `resources/${resourceId}` }]
    }]
  };
  await authressClient.accessRecords.createRecord(newRecord);
  return OK;
}
Core Aspect: Authorization check
Now that everything is set up, each time your software needs to decide whether the user should be allowed to perform certain actions on a given resource, you simply make an API call to Authress. You’ll get back either a 200 (meaning user has permissions) or 404 (meaning user doesn’t have permissions).
Here is an example using the NodeJS Authress SDK to quickly perform an authorization check.
import { AuthressClient } from '@authress/sdk';

const authressClient = new AuthressClient()

[GET('/v1/resources/{resourceId}')]
function getResource(request) {
  await authressClient.userPermissions.authorizeUser(request.userId, `resources/${resourceId}`, 'READ');
  // Application route code
  return OK;
}
Take a look at the full API documentation to see what else is possible or see these authorization resources:
Going Deeper: Authorization topics
🗃️ Access records
Access records grant users permissions via roles on resources.
📄️ Permissions and roles
Permissions, actions--allow, grant, and delegate. How to control access to your applications and services.
🗃️ Service Clients
Service clients are used to support machine-to-machine authentication and authorization
📄️ Modeling matrix permissions
How to improve matrix like resource permissions using Authress