Migrating to Authress
Authress provides Authentication and Authorization, so it makes sense to discuss how to handle the migration for each of these cases. Since each of these pieces is isolated, the migration or use of one of them will not affect your migration or usage of the other. To only migrate your Authorization to Authress, follow the Authorization migration guide. Likewise to migrate your users' identities to Authress, follow the Authentication migration guide.
We know that Authress is critical production infrastructure, and so we can't afford for Authress to be down. There are rare incidents that can affect your infrastructure and ours, and so, even in the event of one of these circumstances we need to a concrete strategy for being alerted and how we respond.
🔑 Authorization migration guide
Authress authorization is provided as a drop-in security module. You can directly start to call the relevant Authorization endpoints as soon as you are ready. This can be done without changing your Authentication or User Identity Solution. Part of getting ready will be to enable your software to directly interact with Authress. The best way to do this is to review the steps for getting started with authorization this section provides the most details on the different components.
Authress already can accept any valid OAuth2 OIDC compliant token. So if you have an authentication system or provider that is already compliant, there is only last step to take to enable Authress. Conversely, in every other situation Authress offers service client api keys to directly call the Authress APIs.
1. Define your user roles
Creating user roles and permissions
2. Import and create access records
Importing and creating access records
3. Perform the authorization check
Authorizing user access in production
👤 Authentication migration guide
The migration of users is more complex, but still just as easy with Authress. We'll walk through the steps to get your users into Authress and easily remove your legacy system.
1. Connect your existing identity provider
Connect your existing identity provider to Authress. Using Authress, you'll aggregate all the different sources of user identities that exist. Some of these might be social logins, other ones could be SAML, OIDC, or SSO connections from your customers.
In this first step, we'll connect your existing user identity system to Authress. No additional changes need to be made, and users can start logging in via Authress. Authress will redirect the users through your existing identity provider, and everything will automatically work.
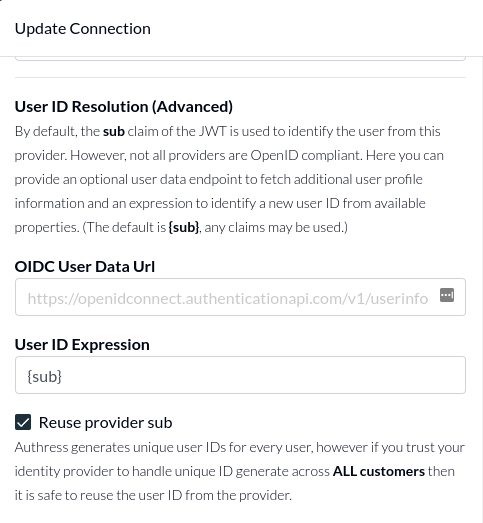
Navigate to Connections and click Add connection. Here you'll fill out the required connection information so that Authress can integrate with your legacy provider.
Authress recommends to all fill out the Advanced section for User ID Resolution. The Reuse provider sub checkbox should be checked. This causes Authress to generate new user identity tokens that contain the same userId as your legacy identity provider. Selecting this is not required, and in most scenarios should not be enabled. However, while migrating your users from another provider to Authress, you want the user IDs to be consistent, so that any data you have that is coupled to the user ID remains accessible by your users.
What if my current provider can't be connected to Authress?
Any provider, such as Log in with Google and other federated providers can be directly connected to Authress. Instead of this first step, we'll skip down to step #4 and handle the users with a direct user migration. Alternatively, Authress supports custom OAuth integrations, and if this is a path that interests your team, please reach out to our support.
2. Verify user access tokens
When you start using Authress, the tokens will no longer be your legacy provider tokens. Authress will consume those tokens and return back a modern OIDC compliant token. These tokens are the new user identity representation and follow up to date OAuth standards and security best practices. While both your legacy identity provider and Authress are active, it is recommended to inspect the incoming token and verify it using the associated mechanism. You of course know how to verify the existing tokens coming from the legacy provider. To verify Authress JWTs, the knowledge base provides this abbreviated guide on JWT verification.
3. Login with Authress
Now that your identity provider is connected, your services are correctly verifying user tokens, the last step is to actually redirect users to log in with Authress. This step is as easy as switching out your current provider in your UIs with the drop in Authress OAuth2.1 compatible library. The Authress Login SDK contains all the necessary instructions to start using it in your UIs right away without any additional configuration. For a quick example of its usage, see the user login flow.
4. Add all your providers
Your users can continue to login using your existing legacy provider. Every thing will continue to work. At some point you'll want to remove this dependency. To do that we will import all your existing connected providers into Authress. For each of these provider, create a new connection. There are a number of examples of using different providers in the connection setup section of the knowledge base.
With all your connections added, users should be provided an option to pick which provider they want, instead of being forced to your legacy authentication flow.
5. Enable identity linking
Now that users can log in through both flows, we'll want to provide them the capability to link these two identities, so that either flow--the legacy identity provider flow or the new SSO/social/federated account login flow--can be used. After the user logs in, direct them to link their identity. To do this, just execute the loginClient.authenticate() functionality specifying the linkIdentity parameter. This works exactly the same as normal authentication, but when the user has completed the flow, the current identity and the new identity will be linked. See linking user accounts for the exact example.
6. Migrate the remaining users
Not every user is going to take the opportunity to use your new log in. Additionally, if you skipped the above steps because your identity provider doesn't have support for the modern authentication standards, this is the opportunity to convert those users. To do this, you'll first want to collect the current list of users in your legacy system, as well as the list of their new user identities. Once you've got this, you can directly reach out to our development team and we'll walk you through the process. While this is easy and quick, it can cause some challenges if everyone isn't prepared for this step. We'll be ready to help as soon as you are here.
🎉 Conclusion
And that's it, at this point, you can retire your legacy identity provider, remove it from Authress and delete the relevant code. You've completed the migration.
Usually we see completion of the user identity migration in a couple of weeks. While it only takes a couple of days of work, allowing the users some time to link their identities does take longer. Additionally, it can be much easier to serialize these steps one a time, and be confident each works before moving onto the next one.
FAQ
Is it better to replicate what we have directly and then make changes over time?
Ve usually recommend to migrate one service/product/user persona at a time. While doing that, start to think specifically about what the new personas are going to be. It doesn't have to be perfect up front, since changing roles, permissions, and access records in Authress is easy. What's more important is not to add unnecessary complexity or complications to the new solution. You are moving away from what you have likely because there are some current problems. Directly copying that complexity into Authress, while doable, starts off on the wrong path, and likely creates a problems down the line. The most common problem is this sets the wrong mindset about how the future of your permissions and user identities might look like.
Since you are starting with a new system, it's best to at least take a few minutes/hours to answer the question of why the change, and what should be different this time around. Having a more concrete view of the new world helps to answer some of these questions.
This is exactly the sort of thing our architects would assist with. It's possible there are some paths that are better than others, so reach out to our Security Architects, and we'll help draw up a plan.
For RBAC (or Role-based Access Control) and other common access control strategies, Authress directly supports them. This means, a simple lift and shift is doable. You can directly migrate to Authress without any additional work.
As an example, in the case of RBAC, if you do have a pure RBAC solution using a custom JWT claim, then a 1:1 mapping works out of the box. To do this, you can directly create new Authress Roles that exactly match what you have today. If however, you a non-standard RBAC implementation, then directly porting your current roles might actually cause problem for some of your service usages in the long term. So we might want to quickly review what you have, where you are going, and help think about it.