Creating application resources
This example uses the Document Repository product as a basis for explaining the technical concepts. Please review the setup before continuing.
Scenario
A user navigates to your application UI and causes your service to need to generate a new resource which will be stored in your database. Only certain users are allowed to generate these resources, and after they generate these resources, they become the de facto owner of them. They should be able to make all the necessary changes to these resources, update them, delete them, and just as importantly create sub-resources.
An example of this might be the admin owner of a Document Repository.
Setup
Roles
Before we walk through the implementation there are a couple of quick setup steps required. The first is the creation of the relevant roles for the Document Repository. From the example we'll need the following roles:
AdminCreator
Service clients
Additionally, we'll need to set up a service client along with an access key, store the access key. As part of the service client setup, click Assign client permissions at the bottom of the client setup:
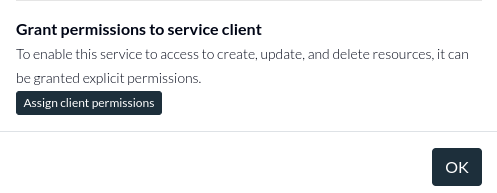
And grant the service client full access over all documents, as well as the ability to create access records. (When an access record is created, the service client will automatically get admin permission to update it, so only creation is required). We need to do this because the service client will be responsible for creating access records and assigning permissions to users when they create new resources.
 .
.
Implementation
Here, we'll walk through the technical implementation and set up requirements to achieve this functionality in Authress.
0. Authorizing document actions
As a first step, we'll review how to verify user access to a document. Remember, we check a user has a permission to a resource. So to check if user user_001 has documents:edit on documents/doc_00a:
// The baseUrl is found in the Authress Management Portal: https://authress.io/app/#/setup?focus=general
const authressClient = new AuthressClient({ authressApiUrl: 'https://auth.yourdomain.com' });

// Get the user's access token from the API request, and pass it to the Authress SDK
authressClient.setToken(userAccessTokenJWT);

// Check if the user has access to edit the document
const success = await authressClient.userPermissions.authorizeUser('user_001', 'documents/doc_00a', 'documents:edit');
1. Creating the document
Since the document repository is private by default, a user must have the permission documents:create in order to create a document. When the user created their account or when they were invited to a Document Repository account, they probably received the Creator role from an account admin. For this example we'll assume the user got this role out of scope of this pattern. When we want to create the document resource in our application, we will make an authorization check to Authress to validate their permissions.
const success = await authressClient.userPermissions.authorizeUser(userId, 'documents/', 'documents:create');
// Then create the document, store it in your database
2. Grant the user ownership over the document
After checking if the user has access to create the document, we can go and create it, and then return the handle of the document to the user.
const docDb = generateDocument();
return docDb.document.Id;
Notice, a problem with that?
The issue is, when the user attempts to update the document in a later step, we'll check if the user has access to edit this document. However, since documents are private by default, no user has access to this document. The only users that would have access to this document are users that have access to all documents (✶).
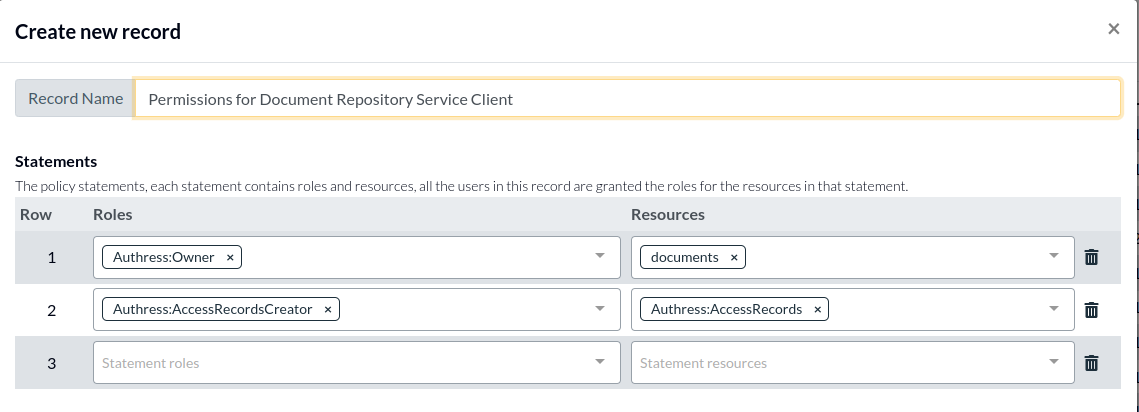
That means the additional step of creating an access record is necessary here. When we create a document in our document repository, we create an access record to match:
import { AuthressClient } from '@authress/sdk';

// Your service client secret can be obtained by navigating to https://authress.io/app/#/settings?focus=clients
// * Edit the Service Client, scroll to Manage secret access keys, and click `Add key`
const serviceClientSecretAccessKey = 'sc_aaa.acc_001.secret';
const authressClient = new AuthressClient({ authressApiUrl: 'https://auth.yourdomain.com' }, serviceClientSecretAccessKey);

await authressClient.accessRecords.createRecord({
  name: `Access to document ${documentId}`,
  recordId: `rec_documents_${documentId}`,
  users: [{ userId: userId }],
  statements: [{
    roles: ['Admin'],
    resources: [{ resourceUri: `documents/${documentId}` }]
  }]
});
Notice how we are using the Service Client here instead of the user's access token. That is done because the user only has access to create documents, they do not have access to update. If we tried to create this access record using the user's access token, Authress would respond with a 403 indicating that the user does not have access. And that makes sense, they cannot grant themselves access to a resource they don't have permissions to yet. Only an entity with a role that already has access to the resource can grant other entities access. And because we took the step above to give access to the service client for all documents, it is authorized to do so.
Frequently Asked Questions
Should I specify the record ID and if so what should it be?
One of the most valuable additions of access record is to be able to specify the record ID. The record ID should match a first-class concept in your platform. There are multiple different uses for the record ID, and each of them is gone into in detail in Record Model Design.