Implementing anonymous authentication and shopper IDs
This guide focuses on how to extend your onboarding experience to include scenarios where users are browsing your site, create resources, and claim access ownership over objects in your platform without ever logging in.
Most commonly this is called anonymous authentication and is usually used to handle building a shopping cart for e-commerce applications.
This guide applies to anonymous users. For users inviting each other, instead use Authress invites. Invites are designed to enable seamless account and tenant management. Only in the scenario where you might have a users browsing non-public APIs and webpages does using Anonymous Authentication make sense.
Scenario
You've already created an onboarding flow for your application, but are now looking to extend support to more nuanced user flows. Anonymous authentication and unique Shopper IDs can be used in many circumstances, and below we'll dive into how to set it up.
Shopper IDs are IDs that are assigned to a user who lands on your site before they log in. They may wish to purchase a list of products from your website, and to do that they'll call some of your APIs and store items likely in a cart. Since your resource APIs are protected and access is restricted to only authenticated users, any request made to your APIs will require a valid JWT signed by your identity provider. This means that your Shopper IDs need to be in a form of JWTs.
The goal of this guide is to enable your application to:
- Generate JWTs linked to a Shopper ID.
- Enable users to use these JWTs even though they aren't logged in.
- When ready, users can exchange the Shopper ID for a real user identity when they log in.
- Resources assigned to the user need to continue being owned by the user after full authentication.
To achieve this we will use the Authress flow for creating a Custom Identity Connection.
1. Create a user verifier
There's an obvious contradiction here in which you want to generate valid JWTs that can be used to identify users and yet not require those users to actually log in. Authress solves this problem by enabling applications to create authentication sessions without login. These JWTs have a user ID present in those JWTs, but unlike when users actually log in, these user IDs are not coupled to a user login.
To prevent this functionality from being used maliciously to generate anonymous users without your approval, these JWTs must be requested by an authorized Authress Service Client that you control.
Since Authress can't know whether an unauthenticated user requesting an anonymous login should be allowed in each circumstance, and to constrain malicious abuse of creating anonymous user IDs, you'll want to create a service that can verify these requests and call Authress.
This only needs to be a very small shim service that can verify a couple of parameters, and runs on a domain that you own. For the remainder of the guide we will assume that this service runs on the domain https://custom-authorization.yourdomain.com and has a route /v1/login which Authress can utilize to verify incoming requests for anonymous authentication.
This service client needs to have the Replace Authress user token generation permission enabled:
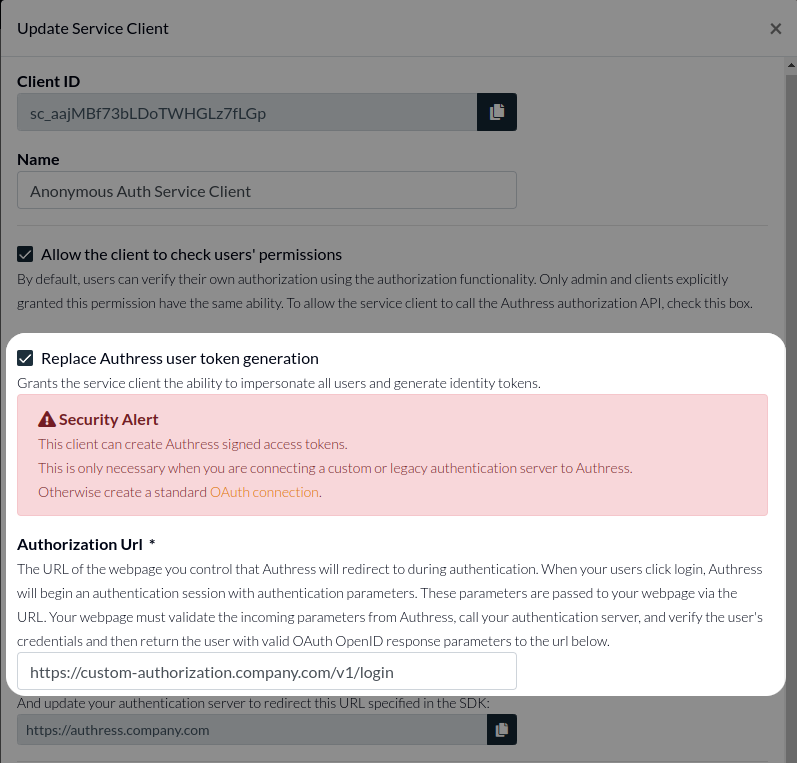
This permission promotes a service client to act as an OAuth token provider. In the Authorization Url field, you will want to specify the domain and route where this logic will be called. In this example we'll choose https://custom-authorization.yourdomain.com/v1/login. Authress will redirect users to this url temporarily, so it must be able to respond to public API requests.
With that, Authress can now treat this verifier as a valid Identity Connection.
Service client IDs have the form sc_{ID}. For your service client, copy the service client ID, in this example above that is sc_aajMBf73bLDoTWHGLz7fLGp, you will need that in the next step.
2. Anonymous User "Sign Up"
When a user wants signs up or logs in, you would call the authenticate method that is present in one of the Authress UI SDKs. Normally, this request would contain a Connection ID that represents an existing Identity Connection registered in Authress. For the anonymous auth, instead of passing a connection ID, you will pass the service client ID. This will start the anonymous user ID generation flow.
import { LoginClient } from '@authress/login';
const loginClient = new LoginClient({
  // Both of these properties can be found and configured at:
  // https://authress.io/app/#/manage?focus=applications
  authressApiUrl: 'https://auth.yourdomain.com',
  applicationId: 'YOUR_APPLICATION_ID'
});

await loginClient.authenticate({
  connectionId: 'sc_SERVICE_CLIENT_ID'
});
3. Verify the anonymous user ID request
When the authenticate method call is made in your UI the user will get temporarily redirected to your user verifier, the one that was set up in Step 1. Parse the parameters from the request query parameters and redirect the user back to where they came from through Authress. This is essentially two lines of code, but you might be interested in extending this complexity more and more depending on your actual needs:
import { ServiceClientTokenProvider } from '@authress/sdk';
import ShortUuid from 'short-uuid';

const serviceClientId = 'SERVICE_CLIENT_ID';
const accessKey = 'SERVICE_CLIENT_ACCESS_KEY';

function v1LoginRequest(request) {
    const state = request.queryStringParameters.state;
    const redirectUri = request.queryStringParameters.redirect_uri;

    // For additional entropy with concurrent user ID generation processes,
    // the recommended solution is to add in a process related prefix
    const userIdGenerator = shortUuid('abcdefghijklmnopqrstuvwxyz0123456789');

    // Note: This user ID will eventually become the user's permanent user ID
    const anonymousUserId = `user_${userIdGenerator.generate()}`;

    const tokenProvider = new ServiceClientTokenProvider(accessKey);
    const authressLoginUrl = await tokenProvider.generateUserLoginUrl(redirectUri,
        state, serviceClientId, anonymousUserId);

    return {
        statusCode: 302,
        headers: {
            location: authressLoginUrl
        }
    };
}
4. Get the token
After the user's request for an anonymous login token has been approved, and the user is redirected to Authress, the user will be returned to where they started except they will now have an active temporary session. To fetch the JWT generated from this session, call the getToken method in the Authress Login SDK.
// Once the user returns to your site, you’ll want to get the necessary credentials.
// These should always be fetched by using the token getter:
const userToken = await loginClient.ensureToken();
You'll notice that throughout this flow, the only difference between a user actually logging in and one that requests an anonymous User ID is that your user verifier is called to authorize this request. Everything else, including the code in your application UI, is exactly the same.
5. User Conversion
Up to this point the user ID is unbound to any user login. This means that no user can log in and be assigned that user ID. However, some of the anonymous users might decide to convert and actually log in. At that moment, that user would technically be a new user and they would not have access to their previous anonymous authentication session and lose access to that previous anonymous user ID. That's because when a user logs in for the first time a new user ID is generated for them. So how do we assign the existing temporary user ID to the new user?
Authress provides a way to couple this new login to the previous anonymous authentication session. The conversion will take place as the result of the user navigating back to your application portal and requesting to log in. (Often this happens during what are known as an abandoned cart flow or a retargeting campaign.) During the authentication process in your application, the original anonymous user ID is associated with user's new authenticated session.
Specifically, Authress converts this once anonymous user ID to the user's permanent user ID to be used in future logins. This is the exact same flow to link two federated user identities, but it works for any connection including the anonymous one you've created using the User Verifier:
import { LoginClient } from '@authress/login';
const loginClient = new LoginClient({
  // Both of these properties can be found and configured at:
  // https://authress.io/app/#/manage?focus=applications
  authressApiUrl: 'https://auth.yourdomain.com',
  applicationId: 'YOUR_APPLICATION_ID'
});

// Then call the `linkIdentity` method
await loginClient.linkIdentity({
  linkIdentity: true,
  connectionId: 'IDENTITY_TO_LINK_CONNECTION_ID'
});
Where IDENTITY_TO_LINK_CONNECTION_ID would be google or another existing connection. For more information on User ID linking see linking user identities.
Users that have logged in once already have a user ID, and therefore cannot have anonymous user ID assigned to them. Only users that have not logged in before can convert anonymous user ID. This is because the login process has to convert the anonymous user ID to be the real user ID for the user. If you run into this problem, an automatic migration can be run to move permissions between the two user IDs. Contact Authress Support for help with this.