Setting up API keys as a Service for Users
This guide focuses on the flow to generate API keys for your users. Authress provides API and Access keys as a service. These keys can be generated at the User, Organization, or Global level, and can each have their own explicit permissions and roles, scoped down or up to their needs. Authress also provides embeddable SDK components to easily integrate the generation and validation of keys into your services and SDKs as well.
For cases with more technical users, your customers can choose to also upload keys to Authress via Bring your own Key, and can be done via the Authress Service Client API.
Key Concepts
To set up and use Authress API keys effectively for your users we will define and use the following terms:
Service Clients- Represents an entity that is allowed to generate tokens for your API. These entities are all distinct, they can have unique permissions and owners, specifiable at the user level, the org level, owned by your internal team, or be assigned individually to your services.JWTs- Either Authress generated JWTs or externally JWTs can be accepted by your services to verify a user or service client entity.API keysorAccess keys- API keys a cryptographically secure encoded string that can be sent to Authress instead of a JWT. These keys can also be used to generate a JWT for increased security.Authress SDKs- The Authress SDKs provide a simple wrapper component to optionally convert an API Keys into a JWT for enhanced security.Role- An Authress Role is a permission collection that contains a list of permissions which can be assigned to any entity in Authress.
More background information about how is works in Authres is also available in this knowledge base, the additional recommended readings are:
Scenario
You would like to offer APIs as a service to your users. This means they are technical users, and wish to directly utilize your API. To do that you know you want to secure access using Authress by generating API Keys. Authress implements this using Service Clients and API Access keys.
This flow works for Service Clients created at any level (user, org, account, global), the flow doesn't change based on which entity should own the API keys or what permissions they should have. Below, we've created an example user story and then use that story to identify how to implement api keys thorugh Authress.
User API Key Example User Story
We want to allow our users to generate API keys to interact with our Document Repository. (As a reminder, the Document Repository is an example service that implements Authress. How it is implemented is defined outside this guide and isn't relevant for this example.)
The Users want to create dynamic API Keys that can be granted one of the Roles created for the application:
Editor- Enables the Service Client toedit a document.Viewer- Enables the Service Client toread a document.Creator- Enables the Service Client tocreate a document.Admin- Grants full access to a Service Client for all operations on a document.
The User should be able to go to a UI hosted by a customer of Authress, and:
- Generate as many Service Clients as they wish.
- Assign only the roles and permissions that they deam reasonable.
- Specify which Documents those roles apply to.
- Receive an API key to be used with your API.
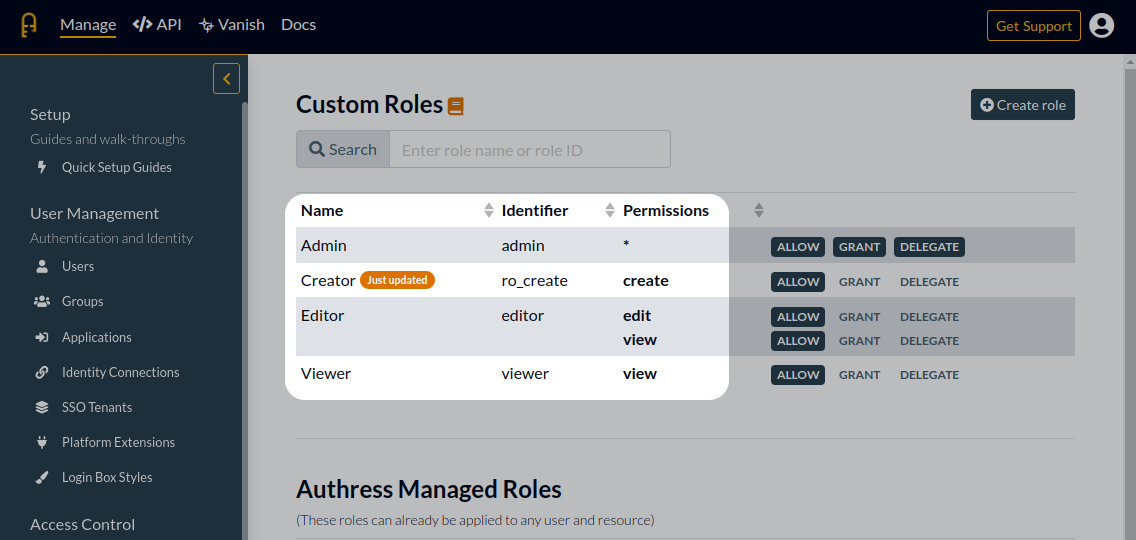
1. Create the necessary Roles
When a user wants to scope the appropriate permissions to a Service Client API Key, we need to first create the necessary roles. Hop over to the Authress Roles management in the Authress Management Portal, and create the necessary roles. This can also be accomplished through the API and through Terraform.
(For more information on how roles work, check out the Roles and permissions guide in the Authress Knowledge Base.)
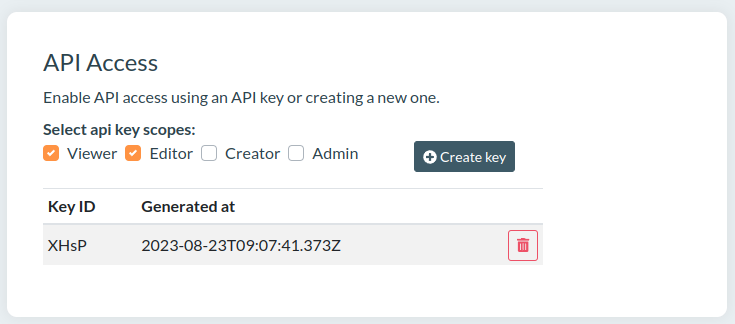
2A. Example UI for token generation
Next you'll likely want a UI that allows your users to create Service Clients and API keys. To make this as simple as possible for the users we'll assume that for every Service Client there is only one API Key. In general, you may need to support additionally:
- Multiple keys - this enables users to rotate a key without creating a whole new service client. There is a trade-off in complexity for security here.
- Bring your own keys - Support BYOK for your users so they can upload a public key.
These two things will be out of scope for this usage guide as they are discussed in more depth in the Authress Access Keys KB article.
When the user requests a new API Key, we can redirect them to a component that will display the configuration that we currently support. While Authress can support even the most complex configuration, not every option will make sense for your users. Here we've decided to only offer the the 4 roles outlined above. However, we could have even configured this component to enable the user to create their own roles from an extensive list of permissions. Or we could enable the user to select which resources they would like to share with the service client. Since we wanted this to be simple we have opted to not include either of those configuration options in our example UI:
2B. Generating the API key
On the service side, when the user selects the configuration they want, we'll need to actually create the Service Client and the associated access key as well as return it back to them.
import { AuthressClient } from '@authress/sdk';

// What should my authressApiUrl be? => https://authress.io/app/#/setup?focus=domain
const authressCustomDomain = "https://authress.yourdomain.com"
// We'll need a global service client access token that we own to perform all of these actions securely in Authress
const administrativeServiceClientAccessToken = 'eyJrZXlJ....';
const authressClient = new AuthressClient({ authressApiUrl: authressCustomDomain }, administrativeServiceClientAccessToken);

// Verify the user's token
const userIdentity = await authressClient.verifyToken(userToken);

// Create the service client
const serviceClientResponse = await authressClient.serviceClients.createClient({
        name: `Service Client for ${userIdentity.sub}`
});

// Grant the Service Client permissions
await authressClient.accessRecords.createRecord({
        name: `Service Client ${serviceClientResponse.data.clientId}`,
        recordId: serviceClientResponse.data.clientId,
        users: [{ userId: serviceClientResponse.data.clientId }],
        admins: [{ userId: userIdentity.sub }],
        statements: [{
                // Specify the list of roles that user selected in the UI
                roles: ['Editor', 'Viewer'],
                // Limit access to this service client only to the resources that this user owns
                resources: [{ resourceUri: `/Users/${userIdentity.sub}/Resources/*` }]
        }]
});

// Generate a new Access Key specifically for this Service Client
const newApiKeyResponse = await authressClient.serviceClients.requestAccessKey(serviceClientResponse.data.clientId);

// Return this information
return {
        statusCode: 200,
        body: {
                apiKeyId: newApiKeyResponse.data.clientId,
                apiKey: newApiKeyResponse.data.accessKey
        }
}
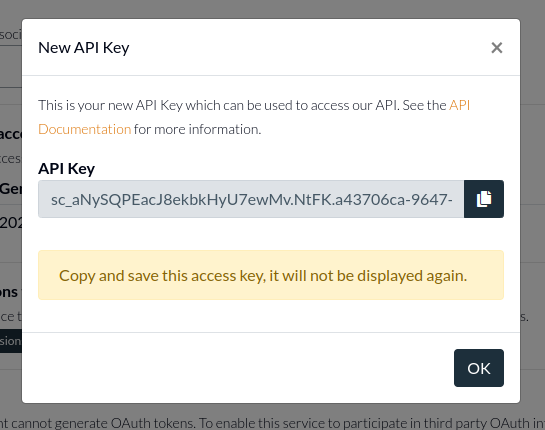
Then we can render this client api key in the UI for the user to select and download.
3. Use the token to call the API
Once the user has received their API key, it is up to them what to do with it. The result however will be a request that is sent back to your API, depending on your security needs Authress recommends using the Authorization header.
curl -XGET https://application.yourdomain.com -H"Authorization: Bearer $API_KEY"
For increased security, you can also provide the user a customizeable SDK that uses the Authress embeddedable SDK functionality to make it easy to securely send the token to your API. More information about this is available in the Buliding a client SDK section.
FAQs
How do we verify the API key or JWT sent by our users
Verifying incoming api keys or JWTs can be done by passing these to the verifyToken method found in the Authress SDKs. The example from the Authress SDK for Javascript is:
import { AuthressClient } from '@authress/sdk';

// What should my authressApiUrl be? => https://authress.io/app/#/setup?focus=domain
const authressClient = new AuthressClient({ authressApiUrl: 'https://auth.yourdomain.com' });

try {
        // Grab authorization header from the request, the best way to do this will be framework specific.
        const userToken = request.headers.Authorization.split(' ')[1];
        const userIdentity = await authressClient.verifyToken(userToken);
} catch (error) {
        console.log('User is unauthorized', error);
        return { statusCode: 401 };
}
Additional Information
More background information about how is works in Authres is also available in this knowledge base, the additional recommended readings are: