Implementing signup and user onboarding flow
This guide focuses on how to create an onboarding experience specifically for your application using Authress. This flow can be used for both B2B customers as well as B2C end users.
Scenario
You are creating an onboarding flow for your application, product, or platform which could be running on mobile, desktop, device, or a native webapp. Users will want to sign up for your product. That means we'll need to send the users through some sort of onboarding flow where the result of the flow will be a valid account with access to the resources they need. Onboarding flows can vary in degrees of complexity depending on your exact needs, but the core of the flow will always be the same.
- When the term
Useris used in this guide, we refer to your application's users, one of your customers. - Likewise,
Accountrefers to your user's customer configuration in your application. Authress accountwill always mean your account in the Authress management portal, used for configuration of your Authress account.
User stories
There are two core user stories related to onboarding that we will tackle throughout this guide:
1. Onboarding User Story - A user signs up for your application or product. They want to create an account to access your services. To authenticate, they'll provide their corporate identity using Google Workspace (although any other provider could be required). Once they log in, they'll be allowed to create an account. After creating the account, they should have access to the various resources available in your service for that account. Such as updating the billing information by entering a credit card.
2. User Invite User Story - At some point later, your users will want to invite others to their account. To do so, they'll provide you with:
- Their corporate identity provider OpenID/SAML/OAuth2 configuration
- And second they'll enter the email address of their team members they wish to invite
Upon doing those two things, these invited users will receive the ability to login via that corporate identity provider and gain access to the shared account.
The rest of the guide will review an implementation for how to deliver the above user stories, and create a successful onboarding experience. The pieces required are:
- 1. New user signup
- 2. Application account creation
- 3. Access to account resources
- 4. SSO configuration for the account
- 5. Inviting other users into the shared account
- 6. Account specific user login & authentication
1. New user signup
The first step of the flow is login. This happens even before account creation. We want to make sure that the user has a valid user identity before granting them access to create an account.
The login flow is:
- On your main website landing page, the user will click the sign-up button.
- Then they will be asked to select their preferred login provider.
- They will log in with that provider.
- And on success, they'll be redirected by to your application with a valid identity.

When the user clicks Sign Up on your landing page, you'll need to ask the user which provider they want to use. Since we don't know who the user is yet, we'll need to provide them with a list of options. There are two solutions here:
- Redirect the user to the Authress hosted login page - The hosted page automatically keeps track of user logins and provides a configurable list for the user to select. See more about configuring hosted login.
- Or you can direct the user to a custom self-hosted page that is part of your application or platform which provides them the list.
It does not matter which option you choose, as the rest of this guide is independent of this choice. We recommend going with the Authress hosted login page to start, until you find a need to change to something else:
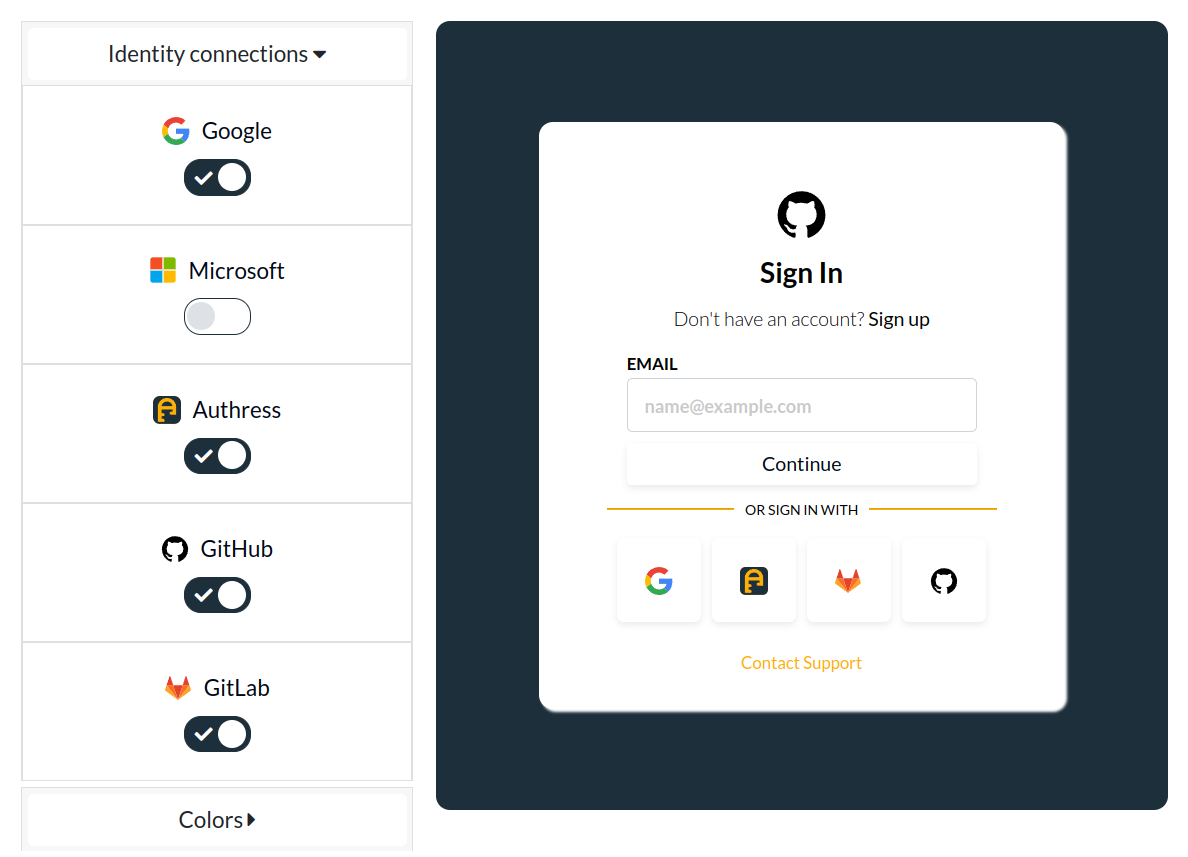
You can see here that this particular configured hosted login page has enabled the login providers--Google, Authress, GitLab, and GitHub. Further, we've set the colors and style to be consistent with our application branding.
When the user actually clicks Sign Up, we need to start the authentication flow. To do this, use the Authress UI SDK.
There is one required piece of information for the Authress UI SDK, that is your authress api host url. This value should be set to either:
- Your
Authress Custom Domain- If you have configured a custom domain for your Authress account, use the Custom Domain specified in the Authress Management Portal. Account Login URL- Otherwise, use the provided default Authress Login Url for you account. You can find this url by visiting the Application configuration. It will be of the formhttps://ACCOUNT_ID.login.authress.io:
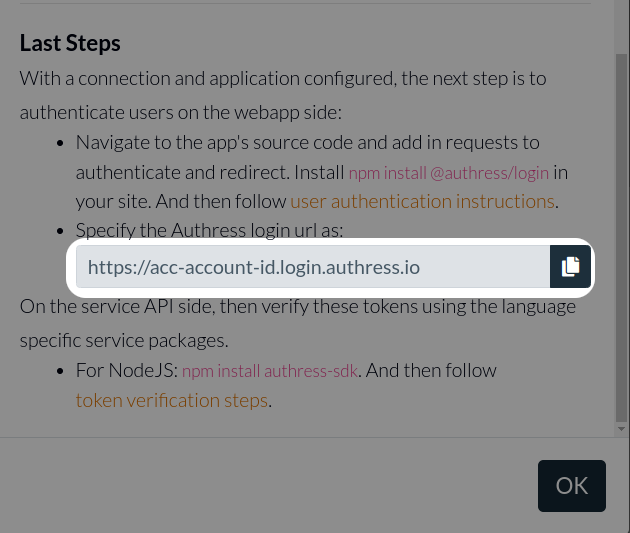
Copy this value, and enter this value for the authressApiUrl into the SDK configuration:
import { LoginClient } from '@authress/login'

// Configure the login client
const loginClient = new LoginClient({ authressApiUrl: 'https://auth.yourdomain.com' });

// Redirect the user to login and the back to the redirectUrl. Usually the redirectUrl should a different page from this one.
await loginClient.authenticate({ redirectUrl: window.location.href });
Execute this code when the user clicks Sign Up. They'll be directed through the flow and end up back at your application, ready for the next step in the onboarding flow.
It's important to pay attention to the redirectUrl property. The redirectUrl is the location you want the user be sent to upon returning to your application. It should be specified as the next page in your onboarding flow.
2. Application Account Creation
Once the user has logged in, they'll be returned to your application to continue with the next step in the account creation flow.
Since they are logged in, they will have an access token granted by Authress. This token can be used to both identify who the user is and also secure your APIs. This token should be sent with every request to each of your backend services. Additionally, the Authress UI SDK also provides User Display Data, that allows you to know the user's name and profile picture, for the purposes of personalizing your UI.
To actually create the account, you probably have some account data that you want to collect from the user. At this step, you would collect this information, and then send it to your service backend to actually create the account.

Collect the information in your UI and make an API call to your service backend. We'll send the data collected from the user as well the access token generated by Authress. (Let's assume your service backend is at my-service.application.com):
import { LoginClient } from '@authress/login'

// Get the Authress generated access token
const userAccessToken = await loginClient.ensureToken();

// Now make the api call to create the account
const createdAccountResponse = await fetch('https://my-service.application.com', {
    method: 'POST',
    headers: {
        Authorization: `Bearer ${userAccessToken}`
    },
    body: JSON.stringify({
        accountDataFromForm: { contactName, contactEmail }
    })
});
You'll notice here we use the Authress generated access token goes in the Authorization header.
When you receive the request into your service, you'll need:
- Verify the token is authentic and is from Authress
- Check to make sure the user can create an account (this is optional)
- Create the account in your database
- Return success back to the user
Checking whether the user can create is optional. Some services allow anyone to create an account, however other ones restrict access to users that have be pre-approved. Depending on your model, you can decide if this additional step is required.
The first thing to do is verify the token. We need to do this to ensure that potentially malicious actors don't create unwanted accounts, and further we'll want to track who the account belongs to. Each of the Authress SDKs support token verification, for reference we've included an example from the Javascript/Typescript Authress SDK.
Below we can see we are performing all the steps necessary:
import { AuthressClient, TokenVerifier } from '@authress/sdk';

// The base URL can be found as the Authress API Host in the API explorer: https://authress.io/app/#/api?route=overview
const authressClient = new AuthressClient({ authressApiUrl: 'https://auth.yourdomain.com' });

// Check Authress if the user can create new Accounts
try {
    const userIdentity = await TokenVerifier('https://auth.yourdomain.com', userToken);
    await authressClient.userPermissions.authorizeUser(userIdentity.sub, 'Accounts', 'accounts:create');
} catch (error) {
    // Will throw except if the user is not authorized to read the resource
    if (error.code === 'UnauthorizedError') {
        return { statusCode: 403 };
    }
    return { statusCode: 503 };
}

// User is allowed now create the account and any additional resources for using your software
const newAccount = await database.createAccount();
return { statusCode: 200, body: newAccount };
And with that, the account will be created, and returned back to the user.
3. Access to account resources
After creation, the user that created the account should have access to all the resources in it. For this guide, we'll call this user the Admin User.
As the Admin User, they would expect access to all the relevant account resources. However, unless we take additional steps we've haven't actually linked the user creating the account and the account yet.
To grant them the necessary access to all the resources in the new account, we will assign them an ownership role over the account and persist this information in Authress. This is done by creating an access record. Access records are how Authress stores permissions and manages access control. Specifically, here, we'll want to create a new access record, granting the Admin User full access to the new account.
The following code snippet does just this by giving the Admin User the role Authress:Owner to the resource Accounts/${newAccountId}. We prefix the newAccountId with Accounts/, as this allows you to better organize your resources in Authress. This is important as later you'll you want to grant users access to sub resources of the account or to resources other than accounts, so namespacing is important.
await authressClient.accessRecords.createRecord({
    // Select a predictable recordId so we can update this later
    recordId: `rec_Accounts:${newAccountId}:User:${userIdentity.sub}`,

    // A helpful name for the record
    name: `Account ${newAccountId} access for user ${userIdentity.sub}`,

    // The user's identity is stored in the `sub` property
    users: [{ userId: userIdentity.sub }],
    statements: [{
        // Grant the Ownership permissions
        roles: ['Authress:Owner'],
        // To the new account
        resources: [{ resourceUri: `Accounts/${newAccountId}` }]
    }]
});
At this point, we've successfully completed the primary user story. The admin user can log in, the account has been created, is sufficiently set up, and they can access all their resources in that account.
4. SSO configuration for the account
At some point, your Admin user will want to invite other users to their account. Additionally, they'll want to specify how those other users will log in. This is known as Single Sign-On (SSO). SSO enables users to log in with their existing corporate identity provider (IdP). And each SSO configuration will be different for each account. That's because each account's SSO will be specific to that user's corporate IdP.
In some cases, your users might not need to setup SSO. If the user's corporate IdP is Google Workspace, MS Azure AD (Entra), GitHub, or another public IdP, then Authress has already automatically configured those without needing additional setup. You can see the default preconfigured login providers in the Authress Management Portal for Connections.
So, you'll need to enable your Admin users to configure their SSO. This configuration lives in Authress. That means getting this configuration from your Admin User and sending it Authress' API endpoint. They will provide this information to you via your application's UI. The UI will then send this information to your service backend, and then along to Authress.

The configuration required in Authress for a user to log in is:
- A new Authress Connection - Stores the IdP configuration
- A new Authress Tenant - Maps the IdP configuration via the email domain for the customer
The easiest way to do this is to have a form that asks for the relevant configuration. The explicit pieces of configuration you need will be specific to the type of identity provider your users have. There are two main connection types:
- OAuth - The configuration is the four properties:
authorizationUrl,tokenUrl,clientId, andsecret - SAML - The configuration is
public x509 certificate,SSO Identity URL, andEntityId
All configurations additionally require a tenantId and a tenantLookupIdentifier. The tenantId should be set to be the newAccountId that was just created. This is how we link the Account to the Authress Tenant. And at least one of the values for the property tenantLookupIdentifier should be the email domain for the customer. This is how we link the user to the tenant.
There are also optional properties that can be additionally configured. These configuration options might be necessary if that provider doesn't implement OAuth or SAML according to the standard. All the options are documented in the portal in the Identity Connections configuration section in the management portal, and samples are available in the Identity Connections examples knowledge base article.
Once you collect the necessary information for the type of connection your user has, take this information and forward it to the Authress API for creating connections and tenants. With the IdP configured, other users with the same email domain can login using their company's IdP via this configuration. Here is an example code snippet that calls the relevant Authress API with a sample OAuth configuration.
import { AuthressClient } from '@authress/sdk';

// The base URL can be found as the Authress API Host in the API explorer: https://authress.io/app/#/api?route=overview
const authressClient = new AuthressClient({ authressApiUrl: 'https://auth.yourdomain.com' });

  // Send the Admin User's provided data to the Authress create connection endpoint.
  await authressClient.connections.createConnection({
      // The connectionId must start with the prefix `con_`
      connectionId: `con_${newAccountId}`,
      type: Connection.TypeEnum.OAUTH2,
      authenticationUrl: request.body.authenticationUrl,
      tokenUrl: request.body.tokenUrl,
      clientId: request.body.clientId,
      clientSecret: request.body.clientSecret
  });

  // Then create the tenant link
  await authressClient.tenants.createTenant({
    tenantId: newAccountId,
    // Use the company's domain as look up key. This is important so that other users can log in with the same email domain
    tenantLookupIdentifier: usersEmail.split('@')[1],
    connection: {
      connectionId: `con_${newAccountId}`
    }
  });

  return { statusCode: 200 };
5. Inviting other users into the shared account
With the SSO configuration complete, other users can log into the share account. Both the Admin User and the other users will be able to log in. However, just because they can log in, doesn't mean the have access to the resources they need. You will need to assign them the appropriate permissions as well.
In Authress, this is accomplished by creating access record. After the user logs in for the first time, the Admin User can assign permissions to the user based on their user ID. However, this can create a burden for everyone involved, so Authress provides Invites.
Invites allow your Admin users to assign permissions to a user that hasn't logged into your application before. The invite process is almost entirely managed by Authress, and provides a drop in solution for managing the permissions for users just based on the invited user's contact.
To create an invite, the Admin User needs to tell you what permissions the invited user should received upon log in. The easiest way to achieve this is to provide a form in your UI. That form should at least contain:
- The
Authress Roleto assign the user. - The Invited user's
contact- such as email.
Any role you've created can be provided here. In general you can provide in your UI a radio button list or a dropdown to allow your admin users to select what role they want to assign to the invited user.
An email address is required, but not by Authress directly. You'll need some way to communicate with the invited user, an email address is one way to do that. Realistically, you will need to create a link, and get that to the user. SMS, email, or even asking the admin user directly to manage it, could be your process.
Take these two pieces of information and send them to your backend. From there, you'll call the Authress API to generate an Invite with the role permissions and resources. (Authress doesn't directly care about the contact information). The response from Authress will contain an invite ID. Take the invite ID and send it in an email to the user using the email address provided. Authress will not email your users directly. This is because your users don't want to know about Authress, they want a customized and beautiful email sent from your corporate domain using your email provider of choice.

Let's take a look at the backend code that generates an Invite. Here we'll assume that the Admin User wants to grant to the Invited User the EditorRole role. This code snippet creates the invite and then sends the email.
import { AuthressClient } from '@authress/sdk';

// The base URL can be found as the Authress API Host in the API explorer: https://authress.io/app/#/api?route=overview
const authressClient = new AuthressClient({ authressApiUrl: 'https://auth.yourdomain.com' });

  // First, generate the invite
  const inviteResponse = await authressClient.invites.createInvite({
      tenantId: newAccountId
      statements: [{
          roles: ['EditorRole'],
          resources: [{ resourceUri: `Accounts/${newAccountId}` }]
      }]
  });

  const inviteId = inviteResponse.data.inviteId;

  // Second, take the invite and send it to the user via your preferred communication strategy
  // Since the Admin User provided you with the email, you can use an emailer to send them an email
  // We need to give them a url that they can click on and will redirect them to log in.

  const loginUrl = `https://application.com/accept-invite?inviteId=${inviteId}`;

  await sendMailClient.sendEmail({
      to: request.body.email,
      subject: 'Invite to Application',
      body: {
          `<a href="${loginUrl}">Click here to accept invite</a>`
      }
  });

  return { statusCode: 200 };
One important step that we didn't do here is verify that the caller of this endpoint has permissions to generate invites. There are two ways we can do that:
- [Simple] Explicitly perform an authorization check via
authressClient.userPermissions.authorizeUser(...), via the authorization API. - [Robust] Pass the user's token to the
Authress SDKdirectly. Authress automatically verifies permissions generated in invites and access records.
(1) is simpler but (2) is more robust. The recommendation is to start with (1) and then later switch to (2) when you scale up, this is something that can be changed at any time.
6. Account specific user login & authentication
Then, the user waits for the email to be delivered. Once they get the email, they'll click on the link. The link in the email must contain two parts--the invite ID generated by Authress, and the link must point back to your application--Authress does not handle the user link from the email. This is because it is insecure for the user to start at Authress and end up in your application. Where the user starts they must finish, this keeps authentication secure.
The Authress recommendation is to create a link that points to your application, and encode the invite ID as a query parameter in that link.
The link will navigate the user to your application UI and start the login process. Then they'll be asked to login with the already configured tenant SSO. This is the same SSO that was configured in Step 4.

When the user clicks on the link and ends up in the UI, you'll need to resolve the invite ID. Parse the invite ID out from the query string, and from there you'll call the Authress SDK passing in the invite ID. Here is the explicit code to parse the query string, and accept the invite in your application UI:
import { LoginClient } from '@authress/login'

// Configure the login client
const loginClient = new LoginClient({ authressApiUrl: 'https://auth.yourdomain.com' });

// Redirect the user to login and the back to the redirectUrl. Usually the redirectUrl should a different page from this one.
const inviteId = new URLSearchParams(window.location.search).get('inviteId');
await loginClient.authenticate({ inviteId: inviteId, redirectUrl: window.location.href });
When the user accepts the invite, three things will happen:
- The user will added to the configured tenant in Authress.
- The permissions associated with the invite will be granted to the user automatically.
- An access token will be generated for the user and available via the Authress UI SDK.
Now the Invited User has logged in, is associated with the correct tenant, and has the correct permissions. This means that they will function as any other user in your application. As compared with the original account Admin User, the only differences will be the permission assigned to this new user, and their userId.