What is Authentication?
While it seems like it can be a simple question, What is authentication and why does it exist?, this actually requires some deep investigation to be really understood. Fundamentally, it is about security. In this article, we'll review what is Authentication, how it works, and why it exists. It's worth mentioning that there is even a longer question that resolves the confusion around What's the difference between authentication and authorization. For the rest of this article, we'll only focus on the user identity part of authentication.
Background
The terms Authentication and Authorization have been over-used, wrongly-used, and misappropriated by products, companies, tools, services, and frameworks to mean many different things. So instead of using these potentially complicated and vague terms, we will stick to Login and Access Control. And by Access Control, we mean Roles & Permissions.
You might hear terms like SAML, OpenID, Entra AD, Federation, or OAuth. These are just a convoluted way to say, "You log into an application by providing your identity through an already existing solution". Login with Google is an OAuth solution.
I have one user do I really need to implement Auth
Yes. At least that's the simple answer, but it's also the more complicated answer.
Even if that one user is yourself, you still want to implement Auth. Historically, you might have run some code on your local development machine, set up some cron jobs, and even run the database all locally. And if those scripts work for you, then that's likely the best solution.
However, there are two things we should consider:
- Is that really the extent of our needs?
- Is it really easier to do that, to avoid needing Auth?
Supporting requirements
Running technology on our machines has become more and more dangerous. For every additional service or application we install, the likelihood of a security vulnerability increases. Further, when we do that, the available technology is significantly more limited. Getting the perfect database, or site, or using the latest web and html framework, just might not be possible when running just on your machine.
The most common scenario is however, providing the value of your service when you aren't in range of your local machine. If it's just some simple data, you could store it in a document share somewhere or even on the public internet where anyone can see it, think GitHub or a WordPress website. But often you want to secure it in some way or you need to have a custom application running, with custom code that you wrote.
This means the app needs to be available on the internet. If your local application connects to a remote service somewhere, a common attempt to work around the need to add any sort of Auth is hard coding access tokens. But do you really want to publicly hard code a token in your client side UI to restrict access? That's not a secure place, but even if it is, for instance distributed in a desktop or mobile app limited to only your favorite colleagues--you can't change it, you can't know if it has been compromised. You also can't test it from multiple locations. Also now that application is a second vulnerable piece of technology, because it has that secret in plaintext.
And, as soon as you have two users, now you are going to want multiple keys. And what happens if one of the users loses their access key? How do you even securely distribute these keys to each user? Does everyone use the same key? Probably not. If you actually do have a need to distribute credentials to another user, tools like Authress Vanish are available to securely send that credential exactly one time.
However, essentially what you are creating is exactly the username/password login flow. As soon as you are there, you might as well use OAuth to enable it. Setting up OAuth with Google or Facebook is much more secure and simpler than setting up a secure password flow. Distributing and validating, is not a simple text comparison. Even if you aren't a fan of social login providers, using one of them will help you avoid all the significant risks with building a secure solution yourself.
Handling user identity authentication is increasingly simple with all the OAuth providers there are today. Additionally, adding token verification is even easier via any of the cloud provider's gateway configurations. AWS offer API Gateway Authorizers. This provides login out of the box for every possible client, as well as protection for your API against malicious attackers. Password resets, username, or email changes, are all built in, depending on the OAuth provider you pick.
Avoiding auth?
To the latter question of Is it really easier to add auth than avoid it?, it is more true now than it has ever been. The whole tech industry has embraced Zero-Trust architecture. This means that everything should be secured via Auth and User Login rather than being protected with a VPN, Firewall, or secured in a local environment somewhere. Since this mentality has proliferated throughout the commercial tech world, doing the same has become increasingly trivial. Just for an example, standing up a new app using Authress for authentication, takes vanishingly little time. There are working code snippets and drop in auth related SDKs, almost all that is required is an Authress account.
In the past there would have been significant setup to get user management figured out, role grants configured, and accounts enabled. But in today's worth this is no longer a problem.
And that's only the first step, as soon as you want something even a bit more complex, that's where a second level of even harder problems start.
Worse still, is the number of pitfalls that exist in attempting to avoid having first class login. You might be thinking that it would be easy to pull in bcrypt to add username/password auth to your app when you need it. However, passwords are no longer the industry norm, and neither is bcrypt. Both of these have been sunset as the root-cause of more frequent attacks. Password-based solutions are responsible for 86% of all breaches. And things like bcrypt are now in the range of diligent attackers.
So let's actually implement Login to deal with all these issues!
The Login Flow
And the best place to start start is at the beginning. The goal of user login is to have the user receive credentials that can be used in your web UI, and then be sent to your API, where they can be verified. The best way to accomplish this is by using an Auth provider. Auth providers take the guesswork out of selecting the more secure encryption and hashing strategies and helping to avoid the complexities in integrations with third parties. For instance, even though there are many Social Login Federation providers out there, none of them provide an interface that matches the standard. Auth providers bridge this gap by providing you with an aggregated abstraction layer so that those complexities remain hidden.
So let's take a look at what the Auth flow looks like:
- Login Chooser Page
- User Login
- The Application Redirect
- Securing UI tokens
- Authorization header
- Verifying tokens
1. Login Chooser Page
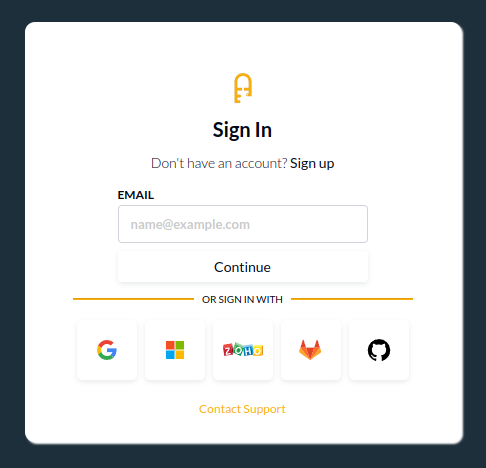
The Login chooser page otherwise known as your authentication page or the Login Box. This is the place where your users land on attempting to actually sign in or sign up. There is no difference between these two from a security standpoint. The user who is not yet identifiable, will need to be first identified by your software, before they can continue. After that everything is the same. Login and Signup are the same and should not be treated differently. You need to know who they are, so that you can perform secured requests to your API.
The whole goal of the Login Chooser page is start the the login process. We need to know who the user is, and we do that by letting them select which provider contains their identity. This selection is important because there are many providers, and any one of them could contain the user's identity. While this login box only contains some options, some providers such as Authress let you customize the login box. Additionally that user might want to use either email address or their company's internal Identity Provider to generate a valid identity. Which means a fixed list is never sufficient. Some login providers also support this level of customization.
As an example, this is the default, not yet edited, Authress managed login box:
2. User Login
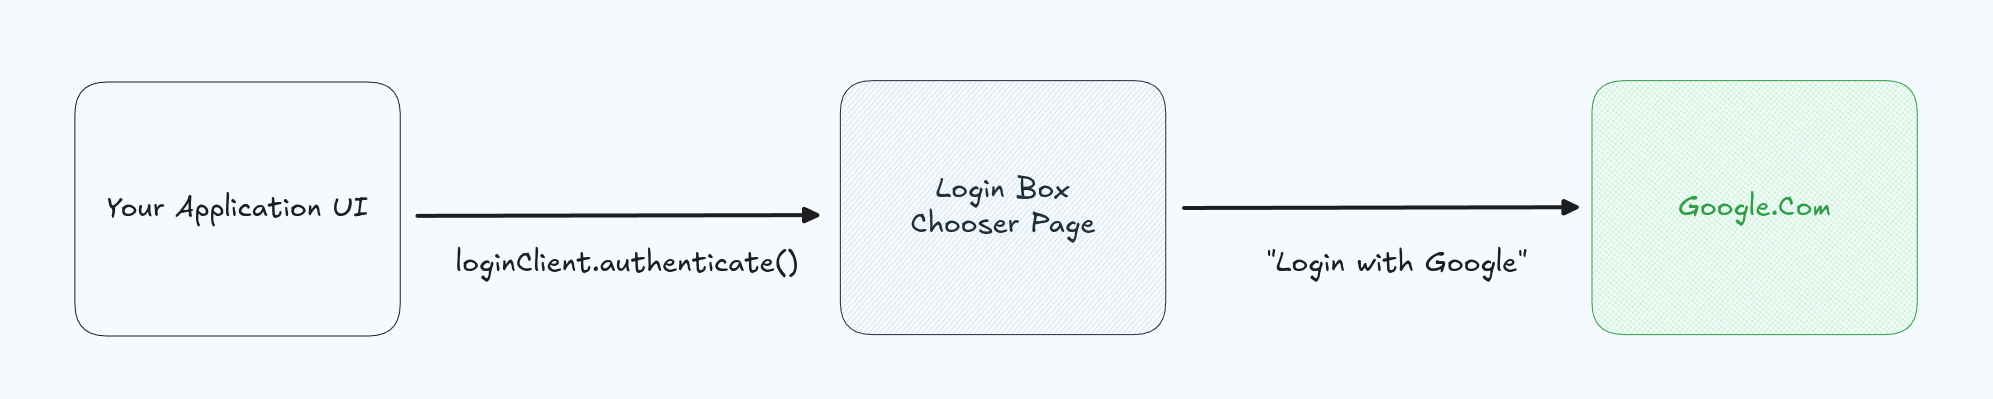
But this is only the visual component. To actually start the authentication flow, your application needs to inform the identity provider that a user is on the way. You do this by starting an authentication request via your identity provider from inside your application. Usually this would happen either automatically or when the user clicks Log in.
import { LoginClient } from '@authress/login';

const loginClient = new LoginClient({
        authressApiUrl: 'https://auth.yourdomain.com'
});

await loginClient.authenticate();
This redirects the user automatically to the login chooser UI where they can select their authentication method. What's important here is that it doesn't matter what state the user is in, that is Completely Logged In, Completely Logged Out, or Somewhere in between. The user might have logged in before and now we need them to log in again, or we might never have seen them. Irrespective of their current state, there is a single method that should drive this functionality. Often it is included in a single SDK method.
Additionally, this code performs all the necessary complexities for handling OAuth, SAML, OpenID, or any other necessary exchange. You might have heard about things like PKCE or Authorization Codes. But with this flow, that's unnecessary complexity, the method handles everything for you including the necessary cryptography. That means if your user needs MFA, FIDO2, WebAuthn, or anything else, this flow will automatically handle it for you. The OAuth, SAML, and others are taken care of by enabling Login through an Identity Aggregator.
In the world of Login there are two kinds of providers, Identity Aggregators and Federated Identity providers. Some providers are only one of these, for instance Login with Google is a federated identity provider. It requires integration with OAuth, others are only Identity Aggregators, for instance AWS Cognito. Some providers are both such as Authress and others that can abstract away the the complexity of the underlying federated providers or provider first-class login that anyone can use. For instance, you can also "Sign up with Authress" and your users might create their own Authress account.
In any case, the application flow starts to take shape.
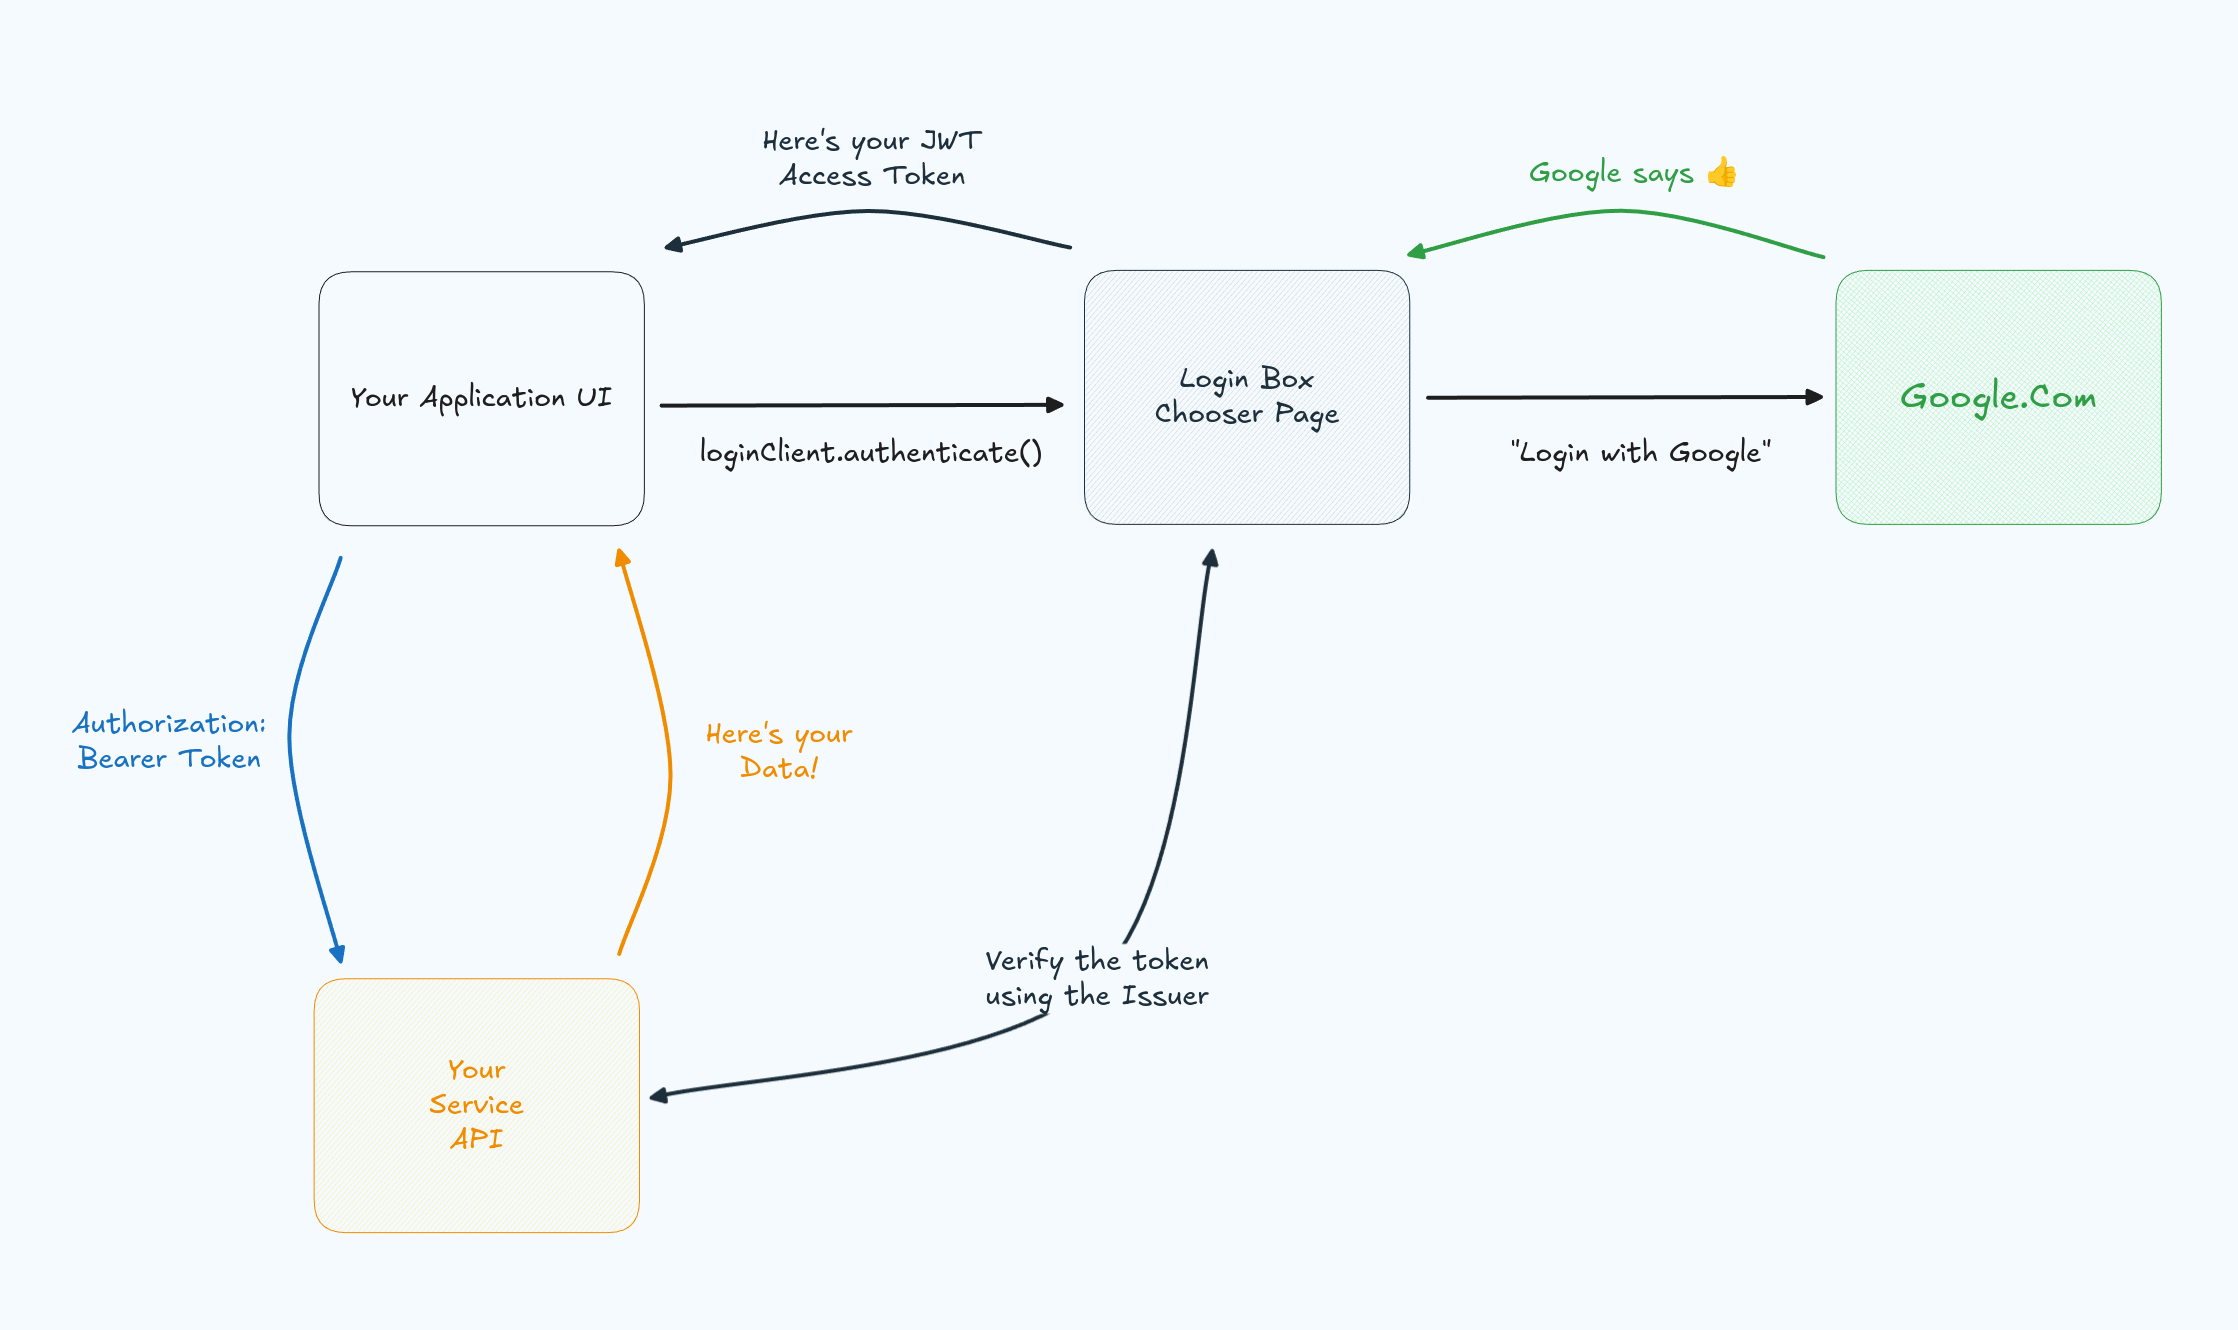
3. Application redirects
Now that the user's login provider gives the giant 👍, that is the federated identity provider returns the a login code that we can use to verify the user has an identity with that problem, we can ensure that they are who they say they are. However, we need to ask exactly what that means. How do we know they are who they say they are, and what does that look like?
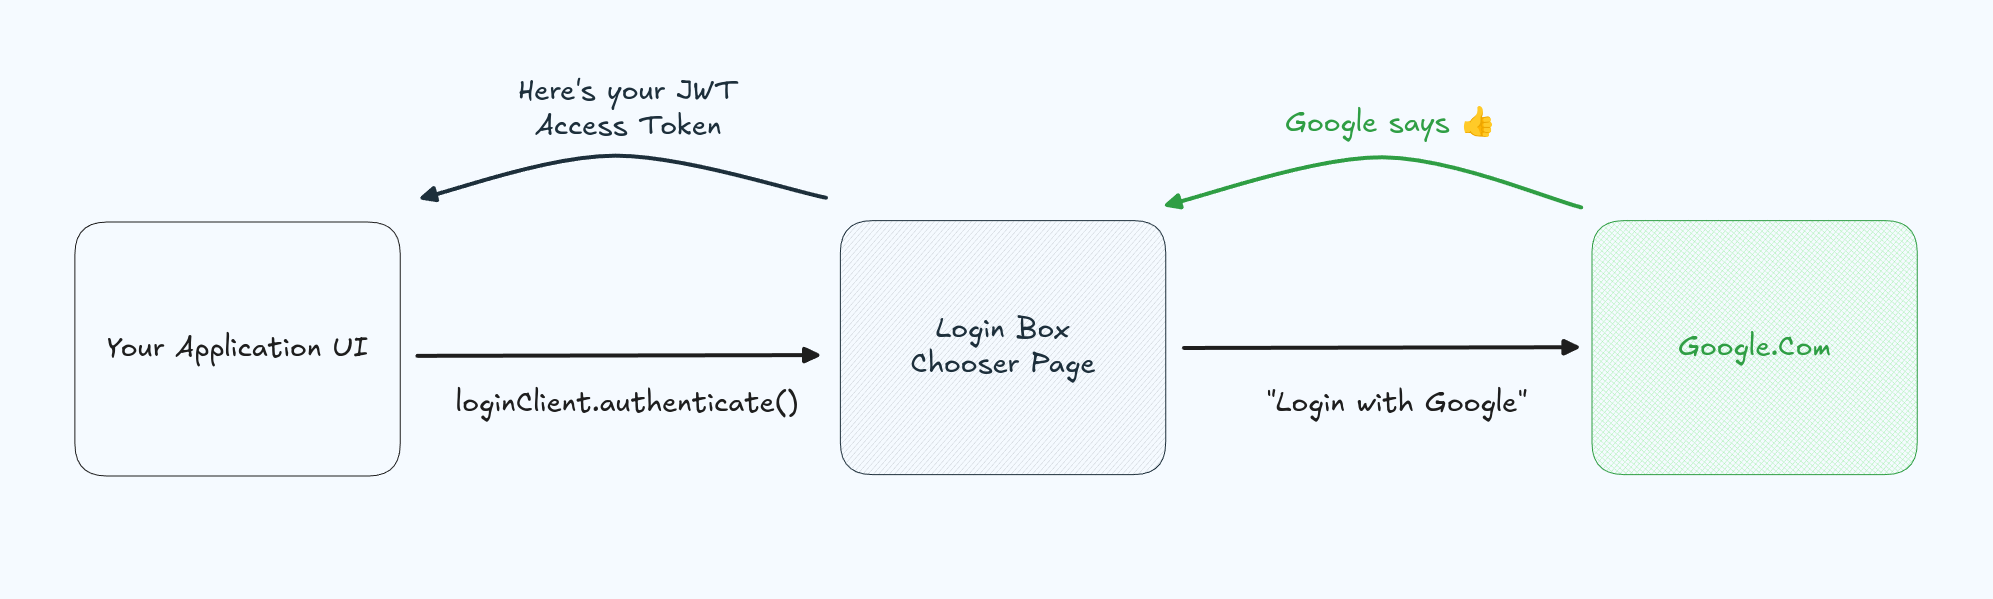
Google redirects the user back through the Login Box Chooser Page, which allows us to verify that the user came from a valid login attempt. What seems like an extra step in the flow actually prevents phishing attacks. While it would be great to enable users to directly log in with Google without needing a login box, chooser page or a redirect, a good security mantra is Users should end back where they started. That means for a user to end back at your Application UI completely authenticated, at some point they must have landed there. Besides phishing deterrence, a good Login Box will also provide MFA support, WebAuthn integration, FIDO2 compliance, device bound sessions, and more. (For more, check out the Auth situation report).
The thumbs up from the login provider is converted into a JWT access token. That's a JSON Web Token, which includes user identity information. This token is also most importantly verifiable. That means any API that receives this token can verify its authenticity. It also means that we can be sure that if we have one, it was generated correctly and not by some malicious attacker.
The JWT given to your application will look something like this:
eyJhbGciOiJFZERTQSIsImtpZCI6InB2ZTQ3OGlHU3g4VzJnc3p6UVlta1QiLCJ0eXAiOiJhdCtqd3QifQ.
eyJpc3MiOiJodHRwczovL2xvZ2luLmF1dGhyZXNzLmlvIiwic2NvcGUiOiJvcGVuaWQgcHJvZmlsZSBlbWFpbCIsInN1YiI6InV
zZXJfaWQiLCJpYXQiOjE2ODUwMjEzOTAsImV4cCI6MTY4NTEwNzc5MCwiYXVkIjpbImh0dHBzOi8vYXBpLmF1dGhyZXNzLmlvIl19.
ciKCNA8PzPfKGGEiGVbbOumGu64Ft55Sh0lOl8IBl9KEuYUaSCw
To save space, complexity, and enable easy transmission between components, the JWT is encoded, but in reality it can be easily decoded into:
{
    "iss": "https://login.authress.io",
    "scope": "documents photos",
    "sub": "user_id",
    "iat": 1685021390,
    "exp": 1685107790,
    "scope": "openid profile email",
    "aud": [
        "https://api.authress.io"
    ]
}
There are some important properties here:
iss- This is the Issuer of the token. Someone we trust to generate user tokens for us. In our case, it will be our Identity Aggregator and Login Box. We'll need to use this later to know how to verify the token.sub- The Subject is our user ID.subis the official standard name of this property from the OAuth RFC Spec, it represents the user who authenticated.exp- The token expiry time. Tokens expire, this tells us if the token is still valid. We'll use it to make sure that this token wasn't stolen and being used by an attacker that got access to our users' or our old logs.- There are other fields, but for pure
LoginandAuthenticationpurposes we don't need to consider them here. If you are curious more about them, check out the other articles in the Authress Auth Academy.
This token ends up back at your application through an application redirect. The Application redirect is the location specified in your application configuration which can be verified. You set this value so that your login box knows where to send JWTs to. That configured application redirect will send the user back to your UI with the JWT. Which can be then used to identify the user both in the UI as well as the API. Think of "user profile picture" in the UI, or "user ID" in your API.
If you've looked closely at our picture, you'll notice at this point there are only UIs there are no backend services. This is not an accident. In order to get a user logged in and receive a verifiable JWT access token, no backend APIs need to be written. As a matter of fact if you are writing a backend for this, something is likely wrong as the full Auth flow only requires your UI. This known as an SPA authentication code flow and uses the PKCE verifier to keep it secure.
4. How do we secure these tokens in our UI?
Depending on your identity provider you might receive the JWT access token in various ways. For instance, with the Authress SDK, you'll get the access token in-memory, or in a HttpOnly protected cookie, or via a javascript enabled cookie. The safest solution is to select the default and consider not changing it. You shouldn't have to do anything special for these tokens to work and be secured, and the most secured place is often in-memory. Both localStorage as well Cookies can have security issues, but realistically all mechanisms are equally secure (or insecure) if the proper protections are in place. Normally, without careful attention to the management of these tokens, cookies can be the least safe solution. However, at least in Authress we've taken extra care to make sure the default usage that is integrated into your application when it comes Authress is secure. That means, Secure By Default.
The least secure thing that can be done however is attempting to convert the token generated by your provider into something else. Common vulnerable scenarios include:
- Converting the returned JWT access token into a session token.
- Converting the response access token into a new custom access token generated by a gateway or proxy on your side.
While it is possible to make these both secure, they can never offer an improve security mechanism as most identity providers are already providing as much security as is possible today. For instance, Authress uses EdDSA token signatures rather than the common RS256 ones. In attempting to convert these to a session or an internally signed token, these signatures are often weakened to a use a cryptographic algorithm that isn't a strong.
If you find that your identity provider isn't supporting a use case that is necessary, it's an important to follow up with them to investigate why. There could be important security implications for why it isn't exactly supported as expected or the tokens are generated in a different way. Ask us if you have a question!
At least with Authress, there is never a reason to store tokens anywhere. Do not store them in your APIs, and you do not need to store them in your UIs. When you receive tokens, via the login process, use them as you wish, and call the associated SDK methods such as userSessionExists, authenticate, or getIdentity whenever necessary, then throw them away afterwards. New tokens are available on request, are often almost free to generate, both from cost and performance perspective, and we'll see more about that below in the How do I keep the user logged in section.
5. The Authorization header
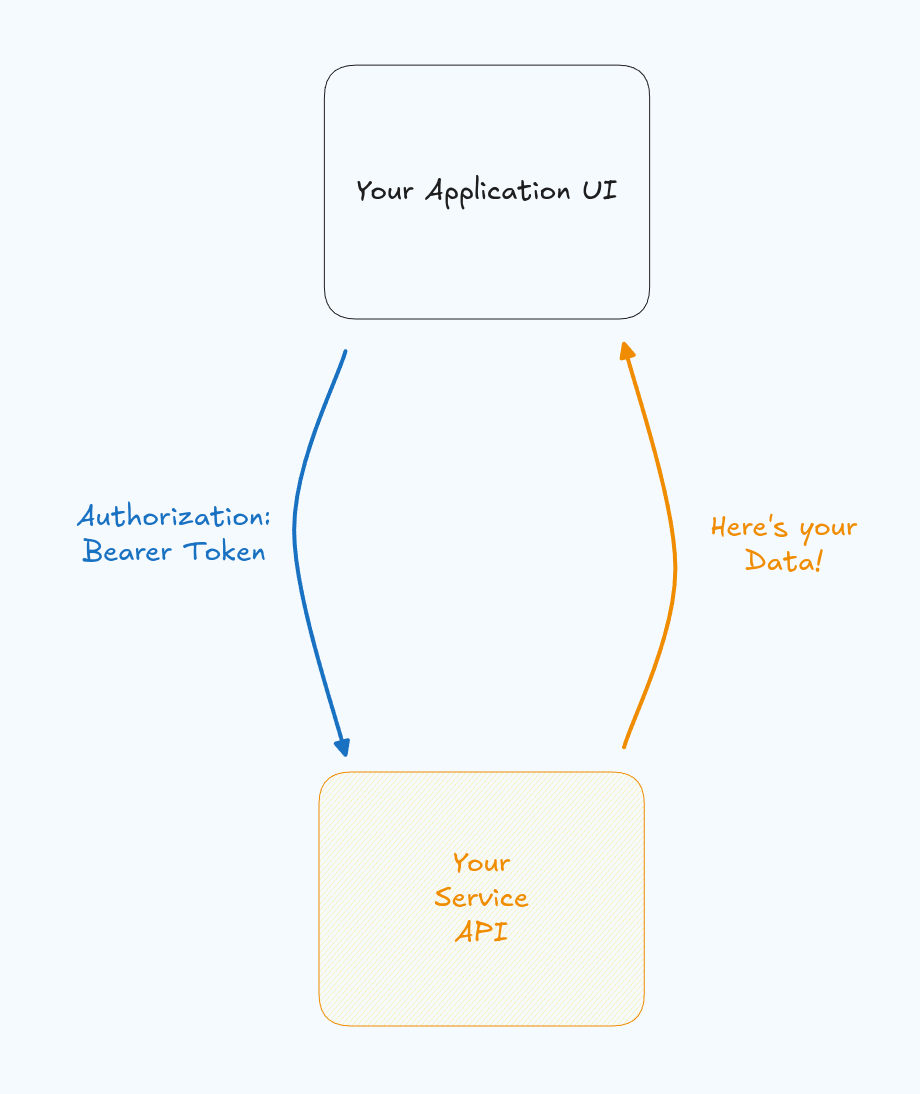
Now that we are getting a valid JWT access token into the app UI, we can use this on our backend to verify all incoming requests. To do that we need to extract the token into our code and then send it with every request to the service. No magic sessions, no magic cookies, the best, easiest, and most secure way to accomplish this is call the SDK from your identity provider and then send that token in the request.
The standard in web applications to pass that token in the Authorization header in every HTTP request to your API. It doesn't matter if you are using GraphQL, REST, gRPC, or something else. As long as you are using HTTP 1.1 or higher, there's a dedicated spot for this.
If we pull this altogether it may look something like this:
import { LoginClient } from '@authress/login'

// Get the Identity Token from your identity provider
const userAccessToken = await loginClient.ensureToken();

// Now make the api call to your service with the token. This is example using a POST method, but any method will work
const createdAccountResponse = await fetch('https://my-service.application.com', {
    method: 'POST',
    headers: {
        Authorization: `Bearer ${userAccessToken}`
    },
    body: JSON.stringify({
        requestData: { requestProperty: value }
    })
});
Great! Now you are successfully sending that request to your API by adding the Authorization header.
6. Verifying tokens in your API
At this point we are almost done. On your service side you'll receive the token in the request from the UI, and need to verify it before returning any data back to the caller. We'll extend our flow diagram with this interaction
Remember that long text string that started with eyJ... we'll need to decode that token, open it up, check to make sure it valid. To that we can use almost any OAuth library or OpenID library in your framework of choice. The short answer is:
const token = 'eyJ...';
const [header, payload, signature] = token.split('.');
const payloadObject = JSON.parse(payload);
An important quality of these tokens is that the signature was calculated with a private key, and we use the public key from the issuer to verify this. So we'll fetch the issuer property, and use that to grab public key. (And importantly we can actually cache the public key to avoid unnecessary requests).
Using the public key we'll verify the signature.
One interesting thing to note here is the header property alg. More secure solutions use EdDSA, ES256, or higher. Less secure solutions use RS256. Never use tokens that have an algorithm which includes HS256, none, or do not specify an algorithm. These tokens are generated by attackers and insecure providers.
To verify the signature, again we can grab an OAuth framework, and it goes something like this:
import { AuthressClient } from '@authress/sdk';

const authressClient = new AuthressClient({ authressApiUrl: 'https://auth.yourdomain.com' });

try {
  // Grab authorization header from the request, the best way to do this will be framework specific.
  const userToken = cookies.authorization || request.headers.Authorization.split(' ')[1];

  // Pass the token to the SDK verification method, the response is a partial User Identity.
  const userIdentity = await authressClient.verifyToken(userToken);
} catch (error) {
  console.log('User is unauthorized', error);
  return { statusCode: 401 };
}
For more details on how this works in Authress, check out the knowledge base article on Verifying JWTs in Authress, or if there are general questions about a generic implementation, try reviewing the blog post on Verifying generic OAuth JWTs.
And with that your data is now protected using user authentication via user login and token verification.
Followup Questions
Why do I need that last step and verify the token?
That's because, frontends are not secure. That is, anyone can fake a frontend UI. You can't ensure that a request is actually coming from a UI that you built, it is always possible for someone to clone your website or mobile app and fake requests from it in a way that you will never know. Attempting to secure requests based on where they came from is never a good solution. This means that things like permissions checks and authorization need to happen in your service layer. Your UI layout layer needs to be separated from your API Data layer, and the Data layer needs to be secured in your backend via your service that owns the access configuration, and in Authress that is the Access Records.
What happens when the JWT access token expires, how do I keep the user logged in?
The solution is Silent Authentication.
In the above pictures, there is a slight omission. That is that your Identity Provider, or Authress if you are using it, doesn't just return a single JWT access token back to your application. It actually returns multiple tokens. Some providers might call one of these other tokens a Refresh Token. However, it was never called a refresh token, it is not a refresh token, nor will it ever be a refresh token. We'll see what Refresh Tokens are below.
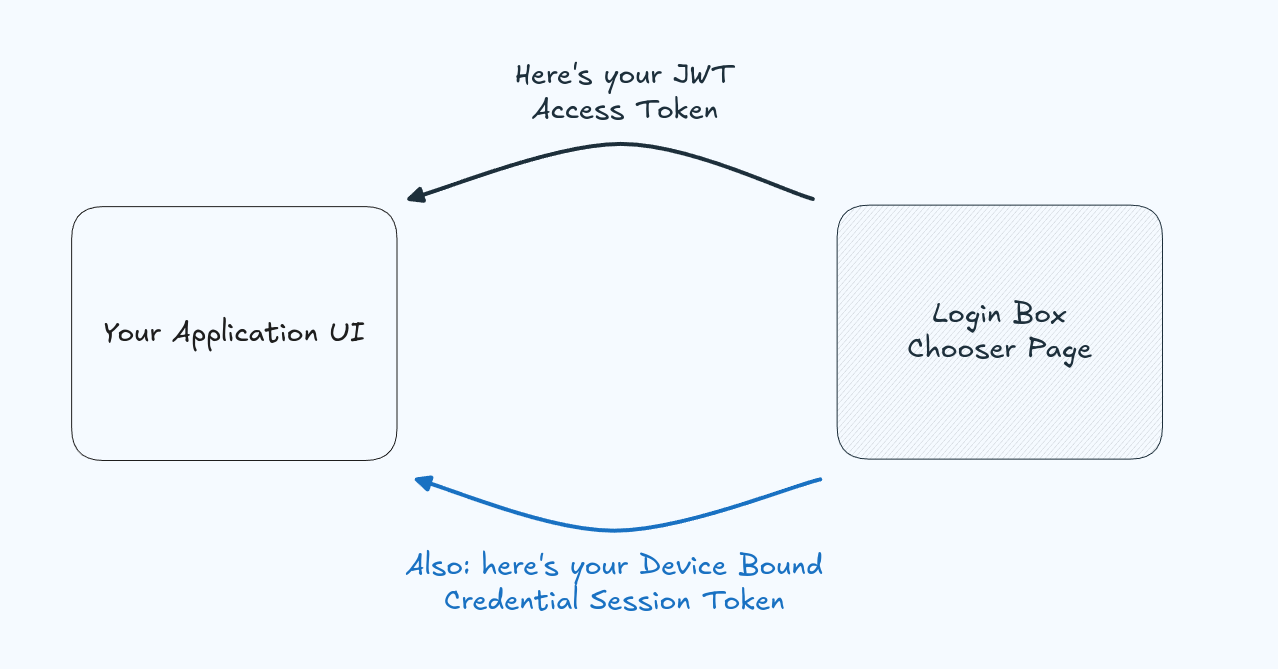
Authress returns both the JWT access token and a Device Bound Credential Session Token. This credential session token outlives the JWT access token and is used by the SDK to automatically fetch new JWT access tokens through what is known as Silent Authentication. Details on exactly how Authress handles silent authentication is available in the Knowledge Base.
The important part to know is that:
- This does not use Refresh Tokens
- The tokens are securely managed automatically by your identity provider
- You never need to consider they exist at all
- When the JWT access token expires, call your identity provider's
authenticate()method, and you should get back a new valid JWT access token.
Often when this flow is executed, the Device Bound Credential Session Token will also be rotated automatically. This helps to prevent token theft, some providers help defend against token theft, others do not.
What about cookies?Cookies don't work in most cases, because the UI will likely be running on a different subdomain than your API. In any platform where there is more than exactly one UI or more than exactly one API, the domain will be different, and the JWT access token will be sent Authorization Header in the API requests.
But what about XSS attacks?Attacks have gotten so sophisticated, that even though the token has a magic little flag on it, for instance HttpOnly, it can't sufficiently protect against leaking your users' access tokens. Frequently, someone might suggest there is a significant advantage, for which we should liken to the use of a screen-door. Screen-doors keep out insects. Additionally, if we look at how XSS attacks are constructed, the rely on one of two key egress mechanisms:
User is phished directly - In this case, your app needs to be explicitly targeted for attack, and the users have to end up on the vulnerable site. In the case that your site is explicitly targeted, then it doesn't matter where a token is persistent an attacker can still utilize it to achieve their end result. For instance, it doesn't matter if they can't exfiltrate your users access token, if they can use the token in the browser to execute a money transfer.
Malicious code is injected into your UI's source code - In this case, rather than the XSS coming from an injected source, the vulnerability exists within your source code already, likely through a public repository package. It is true, that
HttpOnlywill stop indiscriminate token exfiltration for tokens saved in cookies, however, that's all it would stop. All other data, which of course is not protected by theHttpOnlyflag, i.e. all request/response data through your APIs would be wide open. And so a much more effective solution is to use a Content Security Policy (CSP). And with a CSP,HttpOnlycookies no longer serve an benefit. Additionally, use of cookies in most cases, are problematic, because cookies are insecure by design. The current state of using cookies, even HttpOnly ones, is so bad, that most browsers are working continuously to deprecate the usage of these in favor of more secure token management strategies.
What the heck is a Refresh Token, and when do I need to use one?
The TL;DR here is that you almost never need Refresh Tokens, and if you are using one then something is likely wrong. When you have your own users logging into your own UI to interact with your own services with data that you own, then you don't need a Refresh Token. That's because users persist their identity and access in their user-client, their browser, your UI. And device bound credentials allow generating new access tokens automatically before they expire.
Specifically refresh tokens are the way in which your Backend Service API impersonates users that come from third party platforms, so that you can access their data on that platform. There is actually a further caveat here which is, access their data when they are not logged in. If your users only need you to access their data when they are looking at your UI or web app, then you also don't need refresh tokens.
If you are in this second category and need access to a third party system where your users are saving their data, Credential Vaults are the solution for that, and you can read more about how Authress Credential Vaults work.
If there are concerns about how to handle revoking long lived sessions or refresh tokens, there's a dedicated academy topic on Invalidating User Access.
What are API keys and when should they be used?
There is a whole section in the Authress Academy that specifically dives into this topic.
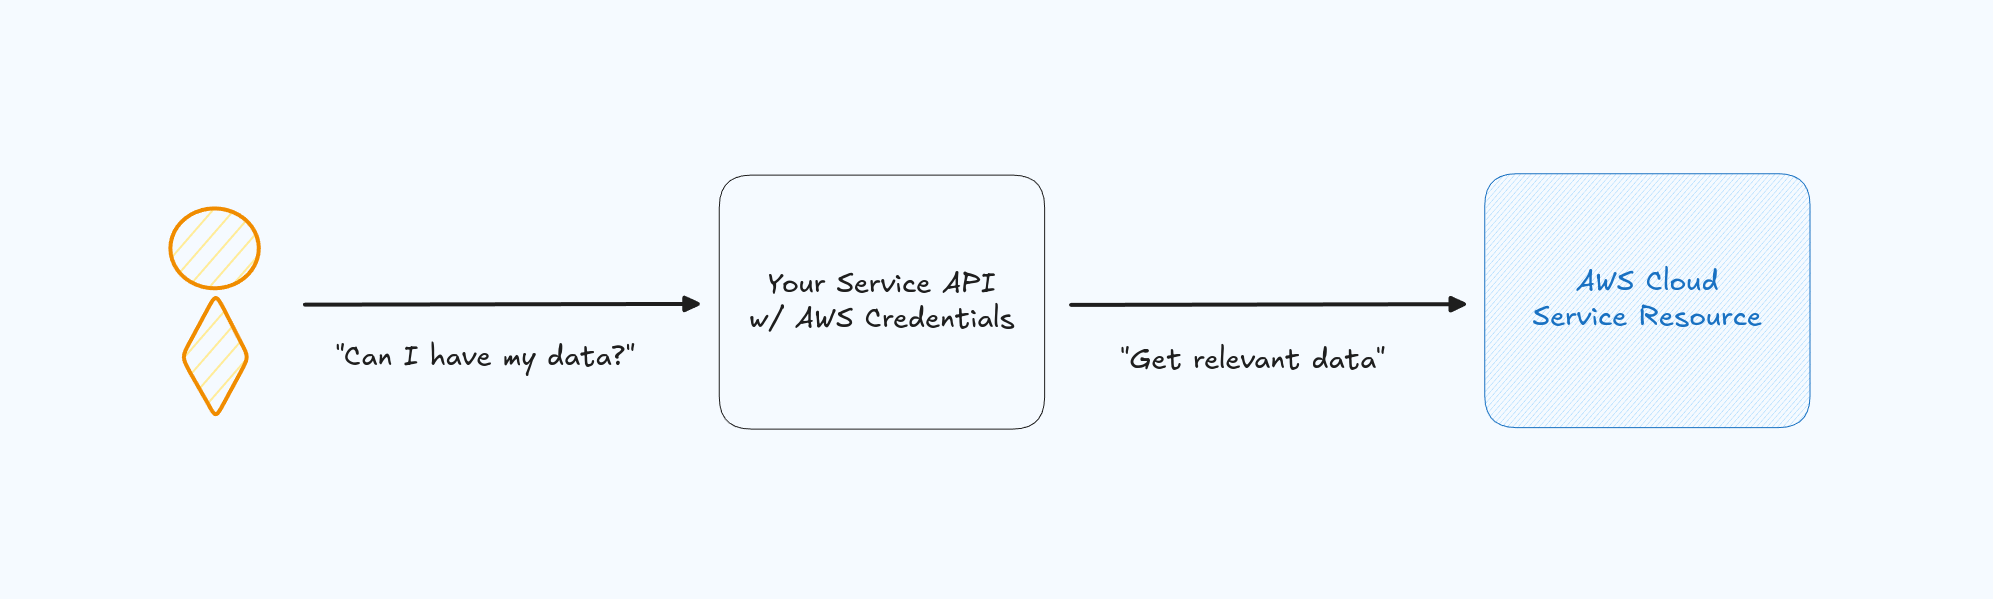
I have AWS credentials how do I use that in my UI?
There might be instances that you want to enable your UI web application or mobile app to directly communicate, configure, or operate cloud resources, such as AWS from inside your app. There is unfortunately no way to secure this at all directly. You should never deploy credentials used for interacting with cloud providers inside a user visible location.
The easiest indicator something is wrong is if you have environment variables. Environment variables are rarely necessary to secure even backend APIs, let alone an application run on a user's device. Even mobile apps are insecure when it comes to environment variables. Instead, your users should authenticate above using an Identity Provider of your choice, and provide an API which can verify requests before sending them to your cloud provider.
Further, in the case of your API. It is likely running in ALB/ECS/APIGW/Lambda/CloudFront which are of course running in AWS. Since these are in AWS already, they each will get autogenerated AWS credentials which can be used to interact with your AWS Control Plane infrastructure. However these AWS credentials cannot be used to interact with other services you own. That's because these services don't run in the AWS Control Plane as they aren't infrastructure. But rather they run in the AWS Data Plan. This is the perfect opportunity use case to convert those AWS Control Plane credentials to IdP credentials using Authress or another provider. It is an important reminder that there is no overlap between the cloud credentials used for the AWS Control Plane and the IdP application credentials used for your application to access your other services in the AWS Data Plane.
What do I not need to secure?
A common misconception is that whenever you see a guid (00000000-0000-0000-0000-00000000) or another cloud provider identifier, that there is a security risk in exposing it. Stifle that thought. Attempting to secure data that is not sensitive creates obstacles using the actual security mechanisms available. A common example might be the application identifier that Authress uses to identify your Application. This is not sensitive information, no one can do any harm if they have it. Additionally by adding these unnecessary systems to secure non-sensitive data, we actually make it harder to use the relevant services, more complexity = more difficulty. And by doing so we might inadvertently create security holes where there would not already be in use. The more security tools you have the more complex system you create. And the more complex system you have the more difficult it is to ensure they are secure.
Examples of things that should never be secured:
- Application IDs
- Login urls
Another signal that something is wrong is if you feel like you have to a write a Backend-For-A-Frontend (BFF). While having one of these is not a problem in itself, but if you believe having one of these increases security then something about your Threat Model is not well identified yet.