Implementing authorization in a simple app
In this example, I will use an imaginary employee expense reports app to illustrate how you can integrate with Authress from within your software. While your app may be different, you will surely recognize many of the patterns related to authorization here.
The application
The app itself is simple - it enables employees of a company (think: your software users) to submit expense reports for reimbursement. You may have used similar tools yourself in the past. If not, imagine that as an employee you paid for office equipment out of your own pocket and now you want your money back.
Typically, it would go like this:
- Employee creates a new expense report and uploads the receipts
- Employee’s manager reviews and approves the expense report
- Finance department gives a green light, the amount is transferred to the employee’s bank account and the report is closed
I’m using a microservice architecture, where the relevant service pieces are as follows:
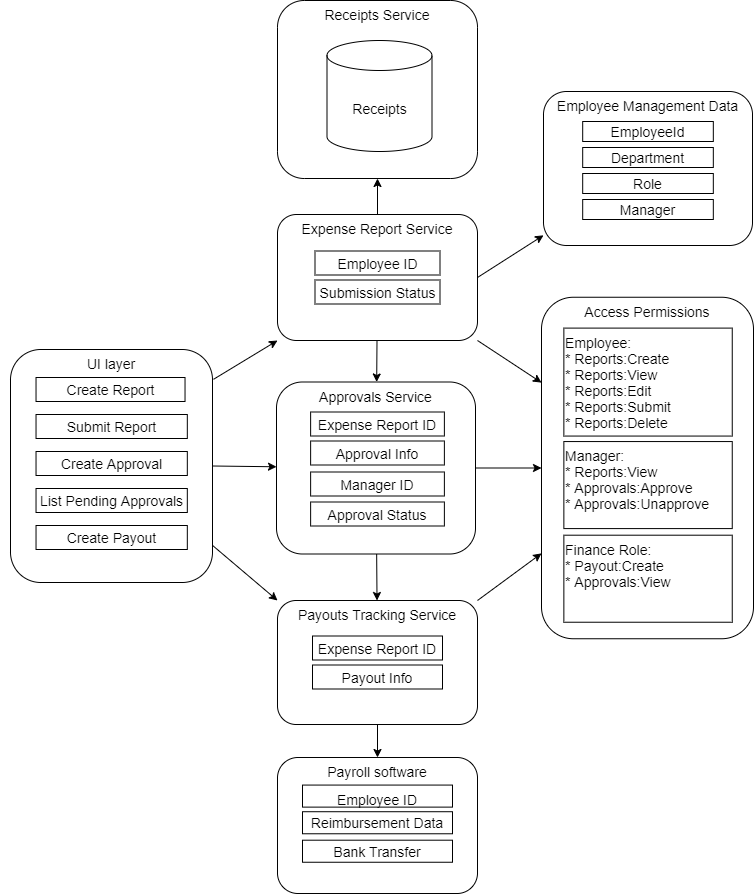
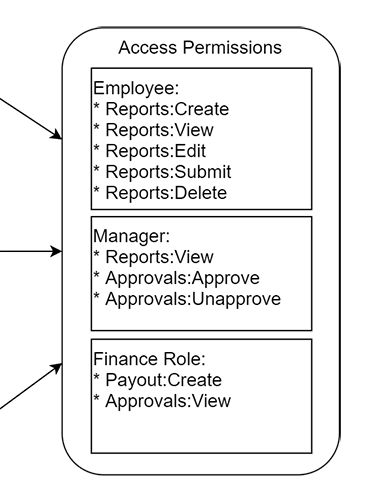
Note that the Access Permissions block is simply a representation of my permissions model - this part will be handled by Authress.
Preparation
Registering service clients in Authress
Based on Getting started with Authress, I’m going to register my service clients. These are all the services that will interact with Authress, that is, ones that need an answer to the question “Can this user do this action?” in some form.
In case of my expense reports app, it will be the UI layer, Expense Report service, and the Approvals service:
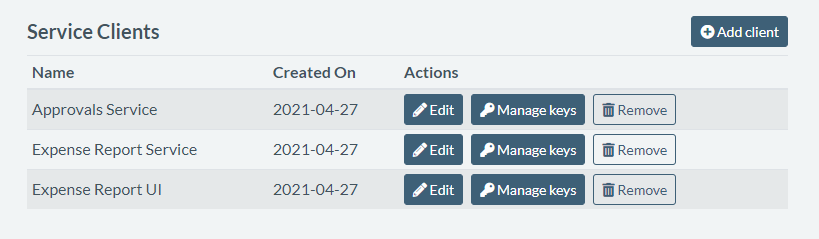
This will allow my services to authenticate with Authress at runtime, keeping all our authorization data secure.
Defining roles
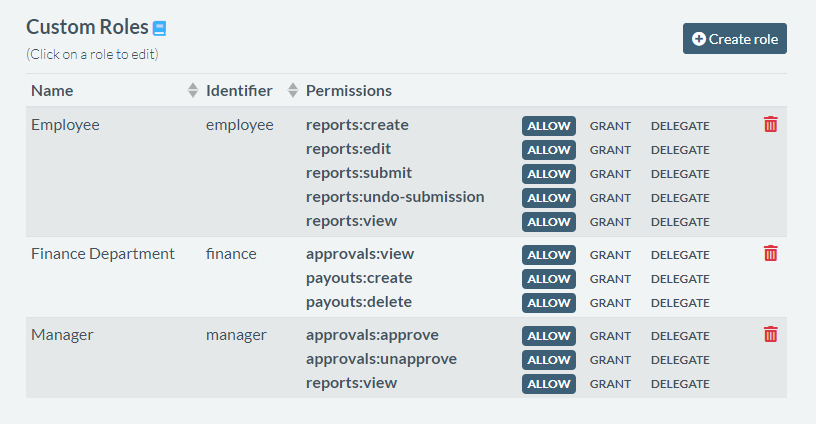
When designing my expense report app, I’ve determined that I need at least 3 different roles, that will represent my employee, employee manager, and finance department personas:
I’ll go ahead and define these in Authress UI, like so:
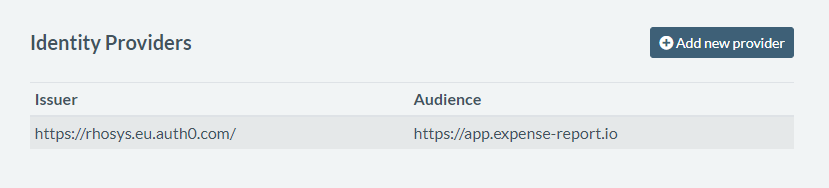
Connecting my identity providers
My app users will want to log in through a mechanism their company already established. It may be Microsoft Azure AD (Entra), Okta, or any flavor of SSO provider they have. Since I don’t want to deal with the complexity of integrating with all of these and I like the convenience of passing around only one type of token, I'm going to use Authress as the identity aggregator.
Authress is able to resolve the user identity from anywhere, once configured. So I’m going to make my life easier by connecting their SSO configuration to Authress in Management Portal.
Almost ready to code
I’m almost ready to plug in Authress into my app to handle the authorization. Because I’m using javascript in my services, I’m going to pull in the node.js SDK into my project.
Implementation - basic in app flow
Let’s take a look at the core flow in my expense reports app and see where Authress comes in.
1. User (employee) creates a new expense report.
To ensure that the user can access their own expense report and edit it later, I’m creating an access record with the user set to Employee. In my app, this corresponds to actions like view, edit, and delete.
import { AuthressClient } from '@authress/sdk';
const authressClient = new AuthressClient({ baseUrl: 'https://auth.yourdomain.com' });

async function createExpenseReport(expenseReportId, employeeUserId) {
  // Check that the employee is allowed to create expense reports
  await authressClient.userPermissions.authorizeUser(employeeUserId,
    `/ExpenseReports/${expenseReportId}`, 'reports:create');

  // If they are allowed then create the expense report
  // and give them permission to make future changes
  await authressClient.accessRecords.createRecord({
    name: `Access to resource ${expenseReportId}`,
    recordId: `rec_reports_${expenseReportId}`,
    users: [{ userId: employeeUserId }],
    statements: [{
      // The Employee role has been defined to contain the necessary permissions:
      // ['reports:view', 'reports:edit', 'reports:delete', 'reports:submit']
      roles: ['Employee'],
      resources: [{ resourceUri: `/ExpenseReports/${expenseReportId}` }]
    }]
  });
}
You may wonder how the user gets the permission to create the expense reports in the first place. That part is covered in the next section: employee onboarding.
2. User edits the report.
Let’s say the user leaves the app and later on proceeds to upload the receipts to their latest expense report. My UI will know to show the report to the user and enable the editing:
async function editExpenseReport(expenseReportId, employeeUserId) {
  // Check that the employee is allowed to update this expense report
  await authressClient.userPermissions.authorizeUser(employeeUserId,
    `/ExpenseReports/${expenseReportId}`, 'reports:edit');

  await UpdateExpenseReport(expenseReportId, data);
}
3. User submits the report.
Now the report is complete, the user submits it, so that it can get the managers approval. I’m creating a new access record to capture it:
async function submitExpenseReport(expenseReportId, employeeUserId) {
  // Check that the employee is allowed to submit the report
  await authressClient.userPermissions.authorizeUser(employeeUserId,
    `/ExpenseReports/${expenseReportId}`, 'reports:edit');

  // Then give the manager access to create an approval
  const managerUserId = await GetManagerForEmployee(employeeUserId);
  const approvalId = await AddToManagersApprovalQueue(managerUserId, expenseReportId);

  // Finally give access to the manager to view the expense report
  await authressClient.accessRecords.createRecord({
    name: `Access to approve expense report ${expenseReportId}`,
    recordId: `rec_approvals_${expenseReportId}`,
    users: [{ userId: managerUserId }],
    statements: [
      {
        // The Viewer role has been defined to contain the necessary permissions:
        // ['reports:view', 'approvals:approve', 'approvals:unapprove']
        roles: ['Manager'],
        resources: [
          { resourceUri: `/ExpenseReports/${expenseReportId}` },
          { resourceUri: `/Approvals/${approvalId}` }
        ]
      }
    ]
  });
}
4. Manager views all reports awaiting approval.
Now a manager logs in. They may have gotten an email notification, or perhaps they do that only once a week. They see a list of all the reports awaiting their approval. Here’s how my code looks like:
async function getAwaitingExpenseReports(managerUserId) {
  const awaitingApprovals = await GetExpenseReportsForUser(
    managerUserId, 'AWAITING_APPROVAL');
  return awaitingApprovals;
}
5. Manager approves the expense report.
Upon clicking the respective button, the manager approves the user’s report. Here’s what happens behind the scenes:
async function approveExpenseReport(expenseReportId, approvalId, managerUserId) {
  // Check that the current manager is allowed to approve this expense report
  await authressClient.userPermissions.authorizeUser(managerUserId,
    `/Approvals/${approvalId}`, 'approvals:approve');

  await SetApprovalStatus(expenseReportId, approvalId, 'APPROVED');
}
6. Finance department processes the reimbursement.
A person from the finance department gets a report of all the expenses ready for reimbursement. My code responsible for generating the report includes:
async function getAwaitingReimbursementExpenseReports(financeUserId) {
  // Check that the current finance user is allowed to view approvals
  await authressClient.userPermissions.authorizeUser(financeUserId,
    `/Approvals/`, 'approvals:view');

  const awaitingApprovals = await GetApprovalsInStatus('AWAITING_REIMBURSEMENT');
  return awaitingApprovals;
}
7. Expense report is closed.
Once the expenses are reimbursed, the related expense report is closed and archived. It can still be viewed by people involved, but can no longer be edited and doesn’t show up in the “awaiting approval” or “awaiting reimbursement” queues anywhere.
async function reimburseExpenseReport(
  expenseReportId, approvalId, financeUserId) {
  // Check that the current finance department user is allowed to
  // create payouts from the expense report
  await authressClient.userPermissions.authorizeUser(financeUserId,
    `/Payouts`, 'payouts:create');

  const approval = await GetExpenseReportApproval(expenseReportId, approvalId);
  const payoutData = await CreatePayout(approval);
  await CloseExpenseReport(expenseReportId);
  return payoutData;
}
Notice that during this whole process, I didn’t have to worry about setting up a caching layer for user’s permissions, nor think too much about what happens if the current manager of an employee changes.
New employee onboarding
Before the core app flow outlined above is possible, I will have to add users (employees) into my app. When doing so, I need to make sure that the new user will have the right kind of permissions. Here’s how it’s done.
async function onboardNewEmployee(employeeId) {
  // Allow an employee to create expense reports
  await authressClient.accessRecords.createRecord({
    name: 'Access create expense reports',
    recordId: employeeId,
    users: [{ userId: employeeId }],
    statements: [
      {
        // The ExpenseReportCreator has only one permission: ['reports:create']
        roles: ['ExpenseReportCreator'],
        resources: [{ resourceUri: `/ExpenseReports/*` }]
      }
    ]
  });
}

async function onboardFinanceUser(financeUserId) {
  // Allow the finance department user to view reports
  // and approvals and create payouts
  await authressClient.accessRecords.createRecord({
    name: 'Access to review approvals, reports, and create payouts',
    recordId: financeUserId,
    users: [{ userId: financeUserId }],
    statements: [
      {
        // The Finance role is defined to contain the necessary permissions:
        // ['reports:view', 'approvals:view', 'payouts:create']
        roles: ['Finance'],
        resources: [
          { resourceUri: `/ExpenseReports/*` },
          { resourceUri: `/Approvals/*` },
          { resourceUri: `/Payouts/*` }
        ]
      }
    ]
  });
}
Notice there are some permissions (like viewing expense reports or creating approvals) that aren’t assigned up front. They are instead handled through access records when a particular expense report is created - this ensures that the right people get access and no one accidentally ends up with more permissions than necessary.
It all looks good so far, but let’s think a bit about what happens when a new employee joins the company that’s using my app.
Someone who is already registered in the app will have to add that new employee, likely by clicking a button in my UI, and that will execute the above code snippet. But can anyone in the world do this? That depends on how I construct the authressClient. Let’s take a look:
async function executeApiRequestAsUser(userAccessTokenJWT) {
  // Pass the user's JWT to Authress, and the SDK will handle the rest.
  authressClient.setToken(userAccessTokenJWT);

  // Any request made with the authressClient will use the user provided JWT.
  // * Authress will automatically validate the actions taken
  //   based on the caller's permissions
  // * No additional call to `authorizeUser` is necessary
  await authressClient.accessRecords.createRecord(/* ... */);
  await authressClient.userPermissions.getResources(/* ... */);
  // ...
  // ...
}
This means that whoever is currently logged into my UI needs to have the ability to assign permissions to other people. In Authress, having a permission to a resource is not the same as having the ability to grant that resource permissions. I will need to use Grant and Delegate options. This means a few tweaks to my roles are needed - read on.
Granting permissions to new users
At this point I have to consider all my user personas once again. I have an employee, who can create expense reports, a manager, who can approve them, and a finance employee, who can create payouts and close the reports. In reality, one person may be all three.
When looking at new employee onboarding, I’ve discovered that whoever does the onboarding needs special permissions. It may be tempting to say that whoever is a manager, can also add new employees. This may be sufficient. But what if my users have an office assistant that deals with such things? Let’s add one more role, “Onboarding” to capture this:
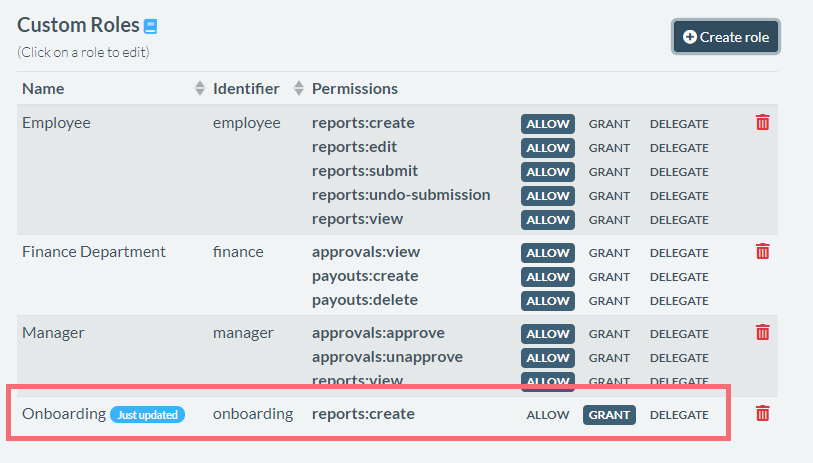
Notice that our Onboarding role doesn’t have “Allow” on reports:create permission, only “Grant”. This means that whoever gets this role assigned will be able to grant this permission to other users, but won’t necessarily have the permission themselves.
Summary
We’ve covered:
- How to setup Authress and integrate it into your software
- Basic approach to user role and permission modelling
- When and how to create access records
- Authorizing users in your app with Authress
- Granting permissions vs having permissions
With these basic cases, it should be easy for you to adapt similar patterns into your own app.