For eons there have only been three ways to "secure" your build platform or servers. All of them have been historically bad, for different reasons:
- On prem - Running the on premise solution. With the whole deployment platform and conceivably your production software running also on premise. Obviously no one wants to do this, that's why we invented the cloud in the first place.
- Use your own runners - The runners can be locked inside your production cloud and call out to your build server to fetch waiting jobs. Your pipeline gets to use an instance profile which defines which roles it should be allowed to assume, and which permissions come with it.
- Use secure environment variables - Inject environment variables into the runners by saving in your CI/CD platform access key and secret for a user. You can't easily rotate this, and it can give far too much access. Still further you have an additional vulnerability for anyone who can get access to the variables, print them out, etc... Also you can't really tell if they have been compromised.
Now you can stop using access key and secret today!
The solution
The perfect solution is if GitLab could directly authenticate with AWS and you give gitlab access directly to the resources it needs, in the context of your job. And now it exists.
Gitlab generates signed JWTs that you can use with AWS to get temporary access tokens. (You don't need any complexity brought by Hashicorp's Vault, you'll notice this works even without it.)
Gitlab's tokens look like this:
{
  "iss": "gitlab.com",
  "iat": 1585710286,
  "nbf": 1585798372,
  "exp": 1585713886,
  "sub": "job_1212",
  "namespace_id": "1",
  "namespace_path": "mygroup",
  "project_id": "22",
  "project_path": "mygroup/myproject",
  "user_id": "42",
  "pipeline_id": "1212",
  "job_id": "1212",
  "ref": "auto-deploy-2020-04-01",
  "ref_type": "branch",
  "ref_protected": "true",
  "environment": "production"
}
Now it's just a matter of setting up AWS to accept that token and allow it to generate an STS token.
We'll be using AWS IAM's AssumeRoleWithWebIdentity to convert the token into an identity
1. Create the Authress Gitlab connection
Navigate to the quick set up in Authress, add a custom OAuth connection, and then swap the the incoming JWT with one that AWS will accept.
Create the connection
- Set the
Authorization URLto behttps://gitlab.com/oauth/authorize - Make sure to set the Audience Identifier and the User ID Resolution, as the gitlab token has neither a sub nor an audience:
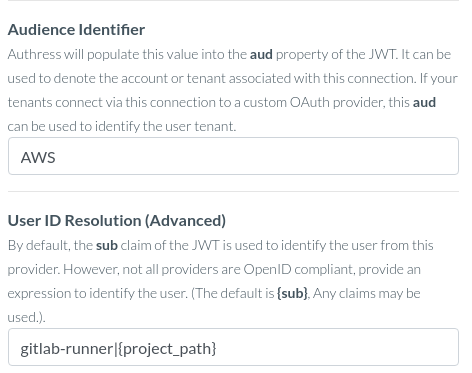
- Leave the rest of the settings as their default values
- One thing to note here is that the
Test Connectionbutton will not work, as we won't be using GitLab OAuth to generate tokens, this configuration is only for token verification, not for token generation. If the configuration matches above, this will work, and the best way to test this out is in #4 below.
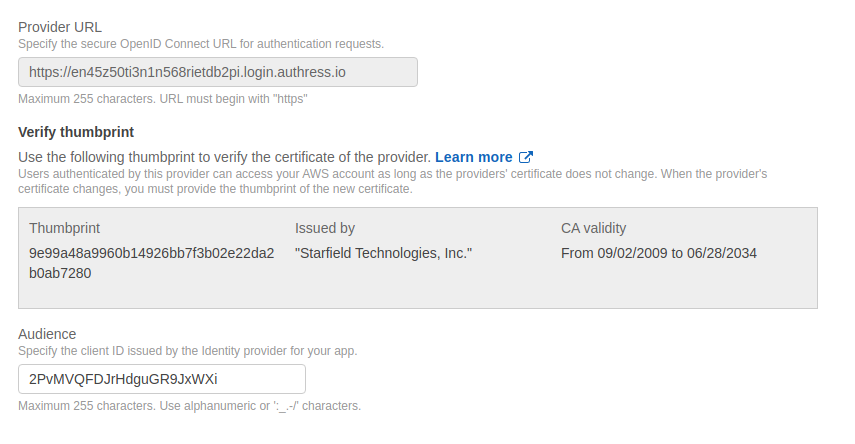
2. Add an AWS IAM identity provider
Create Identity Provider, selecting OpenID Connect as the type. Specify the details in AWS that matches the Authress connection. The provider url will be your account domain from the connection configuration and the AWS Audience will be the connectionId from Authress. If you are using a custom domain with Authress, this will be the custom domain instead:
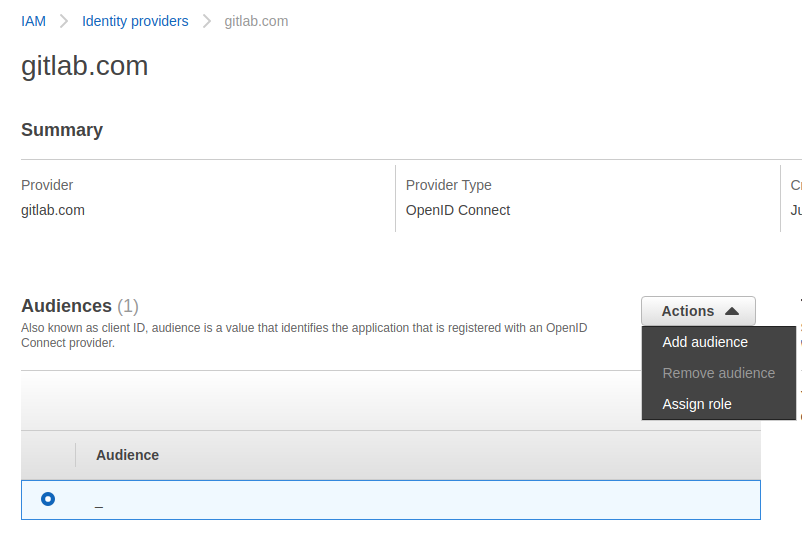
3. Create a role for that identity provider
Assign Role:
Important: Update the Trust Policy to restrict the valid token sources (make sure to replace AUTHRESS_ACCOUNT_ID.login.authress.io with your account's identity. If you are using a custom domain, this should be the custom domain value same as from step #2):
{
  "Version": "2012-10-17",
  "Statement": [
    {
      "Effect": "Allow",
      "Principal": {
        "Federated": "arn:aws:iam::AWS_ACCOUNT:oidc-provider/AUTHRESS_ACCOUNT_ID.login.authress.io"
      },
      "Action": "sts:AssumeRoleWithWebIdentity",
      "Condition": {
        "StringEquals": {
          "AUTHRESS_ACCOUNT_ID.login.authress.io:aud": "AUTHRESS_CONNECTION_ID"
        },
        "StringLike": {
          "AUTHRESS_ACCOUNT_ID.login.authress.io:sub": "gitlab-runner|GitlabGroup/*"
        }
      }
    }
  ]
}
4. Call AWS STS at build time to get your credentials
Exchange the gitlab CI_JOB_JWT token using Authress and then call AWS STS. Here's a javascript example which sets the AWS SDK credentials appropriately:
import axios from 'axios';
import { WebIdentityCredentials, config } from 'aws-sdk';

// Update these values to match your environment
const authressHostUrl = `https://${AUTHRESS_ACCOUNT_ID}.login.authress.io`;
const authressConnectionId = 'CONNECTION_ID';
const iamRoleName = 'AWS_IAM_Gitlab_Runner_RoleName';

const tokenResponse = await axios.post(
  `${authressHostUrl}/api/authentication/gitlab/tokens`,
  { client_id: authressConnectionId, grant_type: 'client_credentials'},
  { headers: { Authorization: `Bearer ${process.env.CI_JOB_JWT}`} }
);

config.credentials = new WebIdentityCredentials({
  WebIdentityToken: tokenResponse.data.access_token,
  RoleArn: iamRoleName,
  RoleSessionName: `GitLabRunner-${process.env.CI_PIPELINE_ID}`,
  DurationSeconds: 3600
});
For more information on the AWS credentials configuration, see the AWS AssumeRole CLI Docs.
FAQs about GitLab configuration
Are the connectionId and api url sensitive data?
While it's a good idea to obscure the connectionId, nothing here is sensitive other than the relevant JWTs. That's the whole point of this authentication mechanism, it removes the sensitive material. It's still good to avoid sharing the AWS account ID as well, as it would allow attackers to call your accounts API and potentially cause DDoS on your infra. But it's still 100% secure, if you have the need to keep these values in the clear.
ErrorCode: Unauthorized
You'll want to revalidate that the token being sent to the Authress Login endpoint is correctly specified. If you aren't sure your code is correct, test out using Request Inspector or ngrok by replace the Authress endpoint call. You'll be able to directly evaluate the data being sent there.